Example: Use the Advanced Lighting agent
Use the Control4 Composer Pro Agents and Programming views to program this agent. (For OS 2.3.0 or later, this agent supports the Panelized Lighting product line with full functionality. Older lighting products are also supported, but with limited functionality.) This agent provides more advanced features than the Lighting Scenes agent. See also “Example: Program Using the Lighting Scenes Agent” in this document.
The Advanced Lighting (Scenes) agent provides these features:
- LED tracking for Lighting Scenes
- Toggle Lighting Scenes
- Ramp and fade Lighting Scenes
- Set delays within Lighting Scenes
- Scene sequencing
- Flash lights in Lighting Scenes
To use the Advanced Lighting agent:
- Start Composer Pro and connect to a Director.
- Click Agents.
- (First time only) Click Add to add the Advanced Lighting agent to the project. Note: You must add the Advanced Lighting agent to the project before your customers can edit Lighting Scenes on a Navigator.
- Select Advanced Lighting, and then click OK.
- In the Agents pane, select Advanced Lighting and then click New.
- Enter a name on the dialog that appears (for example, Party Lights).
- Click Create. Notice that you have more options than if you were using the Lighting Scenes agent. Note: You can click the Rename button to rename a scene.
- Adjust the scene as desired.
- Show flash option—Select this option to add a Flash checkmark in the list of lighting devices below. When Flash is checked, lights can flash on and off at set intervals. Use this option with the Delay option. For example, this option works well in a situation where you want to alert someone so you can set a porch light to flash in case of an emergency or to get someone’s attention. Note: For older lighting devices (earlier than OS 2.3.0), flashing is not supported.
- Activate Scene—Click this button to activate the scene immediately. Note: The Execute On and Execute Off buttons do not appear in the Advanced Lighting agent. Use the Activate Scene button.
- Sync This Scene—Click this button to synchronize this scene with other scenes. This option isn’t really needed for Panelized Lighting unless there seems to be a problem.
- Sync All Scenes—Click this button to synchronize this scene with all scenes created. This option isn’t really needed for Panelized Lighting unless there seems to be a problem.
- Colors—This is the keypad color. Click the Active or Inactive colored boxes to select another color.
- Tracking—Click All Loads to track a dimmer or switch by name, tracking status, delay, rate, level %; and all loads must match their tracking condition before the scene will be considered active. Click Any Load and only a single load needs to match their tracking condition before the scene will be considered active.
- Hold Rates (sec) —Use the up or down arrows to select the Up hold ramp rate or Down hold ramp rate. At the keypad, press and hold for a set period of time in seconds. This action behaves the same as hold rates for dimmers.
- Toggle Scene—This pull-down allows you to select which scene to activate when the current scene is prompted to deactivate. This applies to all scenes except for the current one selected. Here, you can toggle scenes on or off.
- Create a Dining ‘Toggle’ scene. Notice the difference in switches and dimmers and their values from the previous screen.
- Now click the Connections view to connect the keypad bindings on a 3-Button Keypad.
- Toggle Scene/Create Default—Click Create Default to create a toggle scene as a copy of the selected scene. From the copied scene, you can rename the new scene and adjust the values on some of the dimmers or switches in that scene.
- Current State—Shows ‘Active’ when the conditions are met to consider the scene Active or Inactive if the conditions have not been met.
- Add/Remove Load—Click to add or remove specific dimmers or switches to the scene. Check the lighting loads that you want to add, and then click OK. This can be a single light, a single room, all lighting loads in an entire house, or any combination of these options.
Example: Create an Advanced Lighting Scene called “Dining.” Notice the number of switches and dimmers in the Advanced Lighting pane and their values.


When you toggle the 3-Button Keypad in the Dining room, various lights go on or off at various levels. For more information about connections, see “Connect and verify devices.”
Now go back to the Agents view.
- Assign the settings for each load:
- Dimmer and Switch Options:
- Name—The top line is the room, and the bottom line is the name you assigned to the dimmer or switch.
- Tracking—This lets you track the lights in the system. Use the down arrow to select one of these options.
- Don’t Track—Tracking is ignored.
- Is Off—Track when the dimmer or switch is off.
- Is On (Any Level)—The text displays only if the light is a dimmer. Switches just indicate ‘Is On.’.
- On At Level (%)—Track when the dimmer is on at a specific level.
- At Scene Final Level—Track at the final level of the last sequence. For example, if someone changes the level on a Navigator, this might be the final level.
- Delay—Use the up or down arrows or type the delay value in seconds.
- Rate—Lets you set the ramp rate, which is the speed the load ramps to for the specified lighting level. Use the up or down arrows to set the milliseconds (ms), seconds (sec), or minutes (min) of the ramp rate. Then set the amount of time the device takes to change the level.
- Level (%)—Lets you set a target lighting level as appropriate by using the pull-down menu, for example, 50 percent for the Bedroom Dimmer and 20 percent for the Theater Dimmer. The green + gives you the ability to add ‘paths’ to a scene. Each row in the path uses single delay/rate/level settings. Use the green + to add another step, click the red x to delete a step, or you don’t need to have any steps. Note: Older lighting devices (prior to OS 2.3.0) only allow 0 or 1 steps.
- Apply To—Click this option to allow other lights to use the same scene.
- Ignore Scene Ramp/Fade—Check this option to have the light ignore commands to ramp or fade a scene.
- Graph—Shows in graphical form (red lines) the settings for each dimmer or switch. Dimmers will show ramp rates, delays, and levels as angled, horizontal, or vertical lines.
Tip: If you have several dimmers in a long hall, and you want to set up sequencing, you can use this option with the green + buttons and increase the delay of each dimmer in a row by two seconds.
Example: Set the time to 1 second for both the Bedroom Dimmer and the Theater Dimmer.
- Now click Programming. To program a scene, follow the basic steps in “Programming Basics for Control4 Systems.”
- Is invoked—This event fires when the scene has been explicitly told to activate. If the scene is already activated, and it is told to activate again, this event will still fire.
- Becomes Active—This event fires when the scene transitions from the Inactive state to the Active state.
- Becomes Inactive—This event fires when the scene transitions from the Active state to the Inactive state.
- Actions— (Activate, Deactivate)
A programming example for use with the Advanced Lighting agent might be where, if the front door opens and it’s past 9 PM at night, all the lights turn on in the home at various levels.
Note: In the Programming view, the Advanced Lighting Scene has variables, conditionals, and loops that do not exist in the Lighting Scenes agent. This agent also has ‘read-only’ variables for the length of each scene.
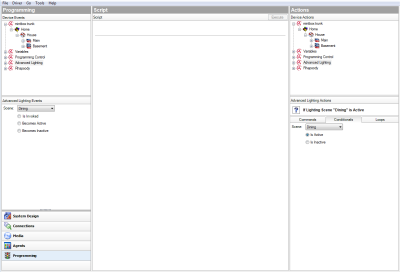
Example: Note the screens below. The Events and Actions panes use different options than the Lighting Scenes agent (Activate, Deactivate, etc.).
Event: (Is Invoked, Becomes Active, Becomes Inactive)

