Connecting Z-Wave devices
After you have added all the necessary device drivers and motorization, sensor or light drivers into your project, you are ready to make the necessary connections for these drivers.
There are two types of connections that need to be made:
-
Connect Z-Wave device drivers to the Z-Wave controller and identify them into the project
-
Connect Z-Wave device drivers virtually in the Control4 project to motorization, sensor, or light drivers
Connecting Z-Wave device drivers to the Z-Wave network
To connect a Z-Wave device driver to the Z-Wave controller:
-
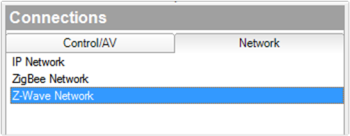
In Connections in the Network tab, select Z-Wave Network.
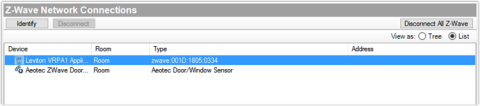
A list of Z-Wave device drivers will show in the Z-Wave Network Connections window.
-
Double-click on the Z-Wave device driver to open the identify window or highlight the device and click on the Identify button.

-
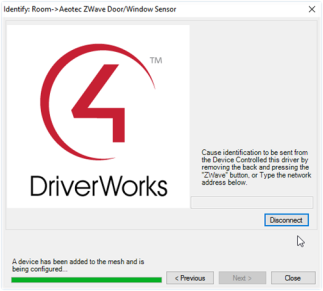
Identify (add) the Z-Wave device according to the manufacturer’s instructions, usually by pressing a Z-Wave button on the device. See the documentation for the Z-Wave device for more information.
Note: You have 60 seconds to identify (add) the Z-Wave device to the network and a timer will show the time remaining. If you run out of time, close the window and try to identify the Z-Wave device again.
-
After adding the Z-Wave device to the Z-Wave network, the driver will do some additional configuration.
Important: Do not skip this step by closing the window or clicking next!
-
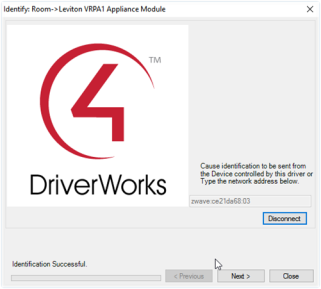
If the device is added, configured, and identified successfully, the address will show in the address field and the timer instructions will change to say “Identification Successful”.
Note: If the Z-Wave device will not identify (add), you should try to remove the device and then try to identify the device again. See “Removing Z-Wave devices”.
Connecting Z-Wave device drivers to motorization, sensor or light drivers
To connect a Z-Wave device driver to a motorization, sensor or light driver:
-
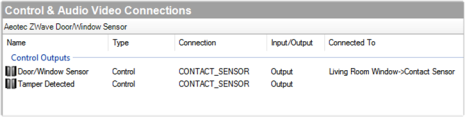
In Connections under the Control/AV tab, select the Z-Wave device driver. The Control & Audio Video Connections window will show the available connections.
-
Click on the Control Output connection Door/Window Sensor and the available devices to connect appear below in the CONTACT_SENSOR Input Devices window.

-
Click and drag the contact sensor output in the upper window to the contact sensor input in the lower window. When a valid connection is available, the cursor changes and has a + symbol. Release the mouse button to make the connection.

When the Z-Wave devices are connected to the appropriate motorization, sensor or light drivers, the UI will now show appropriate drivers to represent the Z-Wave devices. Now the Z-Wave device drivers must be connected to the Z-Wave controller and identified in the project.
Available Devices
When the device is identified and added to the Z-Wave network, the Available Devices window will show the device online with a green icon. A Z-Wave device that is added to the Z-Wave network and also identified to a device driver will show the device driver name and location next to the Node ID.
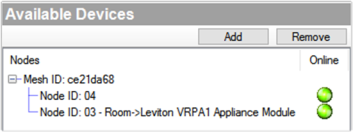
Z-Wave devices that are added to the Z-Wave network, but not identified to a device driver will show up with just the Node ID.