Configure a Wireless Outlet Switch for power-sensing AV devices
Use the Wireless Outlet switch and its plugged-in device to:
- Control a plugged-in audio/video component (such as a DVD player or VCR) or other electrical equipment controlled by IR.
- Control power to a plugged-in relay device (such as a pump) or other household appliances.
- Switch a plugged-in lamp On or Off.
The instructions below describe how to configure an Outlet Switch in Composer Pro for a Samsung television. For instructions about how to configure the other actions, see “Configure a Wireless Outlet Switch V2.”
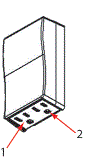
Each Wireless Outlet Switch has two outlets: Outlet 1 and Outlet 2. When the Wireless Outlet Switch is plugged in to the wall, Outlet 1 is on the left and Outlet 2 is on the right.
IMPORTANT! When configuring the Wireless Outlet Switch, you need to add two drivers:
- One for the Wireless Outlet Switch
- One for the plugged-in device
In addition, define the connection between these two devices in the Connections view > Control/AV tab.
Prerequisites
- Ensure that your project has a Control4 controller added and identified on the Control4 system.
- Ensure that the Wireless Outlet Switch object is added to the project tree, and is identified on the Control4 system.
- Ensure that the AV device, for example, the Samsung Television object, is added and configured for the device.
To configure a Wireless Outlet Switch to use an AV device:
Select the Power Codes
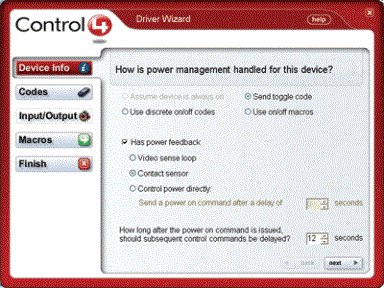
- In the project tree, right-click, for example, Samsung Television and select Edit Driver. The Driver Wizard opens.
- In the Driver Wizard, check Has power feedback.
- Change the Power Management option to Contact sensor; ensure that the Send toggle code is selected.
- Click Codes.
- In Codes under Default Commands, make sure Power On and Power Off, or Power Toggle items are not checked. If they are, any programming you do in conjunction with power using the Wireless Outlet Switch and the television is invalid.
- Click Finish.
- Click next to close the window.
IMPORTANT! Don’t click back to check if the selection was saved because it refreshes the screen; in that case, you will need to redefine what you just defined.
Define the connection
- Define the connection between the Wireless Outlet Switch and the plugged-in device (Samsung Television).
- To do this, in the Connection > Control & Audio Video Connections pane select the Samsung Television that is plugged into the Wireless Outlet Switch.
- From the top screen drag the Contact Sensor connection to the correct sensor on the Wireless Outlet Switch in the bottom screen.
- Before you can use power sensing for the plugged-in device, perform Power Learning on the Wireless Outlet Switch for that plugged-in device on the appropriate outlet.
- Turn off the device plugged into the Wireless Outlet Switch.
- Push and hold the button on the top panel of the Wireless Outlet Switch until the two LEDs toggle orange On/Off, alternating back and forth.
- Select an outlet to configure (Outlet 1 or 2) by releasing the button when the LED that corresponds to that outlet number lights up.
Example: If a device is plugged into Outlet 1, release the button when LED 1 lights up. The LED you chose flashes orange, indicating that the Wireless Outlet Switch is learning a steady state of the device (such as On or Off). When the LED turns solid orange, the Wireless Outlet Switch has learned the steady state, but has not yet determined whether the state is On or Off.
- With the LED now solid orange, turn the device plugged into the Wireless Outlet Switch On. The LED again flashes orange while the Wireless Outlet Switch is learning the On state. When the learning completes, the LED glows solid orange again to indicate the Wireless Outlet Switch has learned the steady state.
- With the LED now solid orange again, turn the device Off. The LED flashes orange to indicate the Wireless Outlet Switch is waiting for a steady state. When the device reaches a steady state, the LED glows red to indicate that the Wireless Outlet Switch has learned the Off state.
- With the LED now solid red, turn the device On again. The LED flashes orange to indicate it is waiting for a steady state. When the device reaches a steady state, the LED glows green to indicate the Wireless Outlet Switch has learned the On state.
- With the LED now solid green, press the button on the Wireless Outlet Switch one time to save and exit the Power Learning mode.
Tip: Use a quick-button press during any step prior to the LEDs turning solid red or green to exit the Power Learning mode without saving.
- Repeat the steps to configure the other outlet (Outlet 1or 2) as needed for any additional plugged-in device.
- To unlearn a device, press the button nine times, but use with care; as this will reset both outlets.