Configure a Wireless Outlet Switch V2
Use the Composer Pro System Design and Connections views to configure a Wireless Outlet Switch.
Configure and use the Wireless Outlet Switch and its plugged-in device to:
- Control a plugged-in audio/video component (such as a DVD player or VCR) or other electrical equipment controlled by IR.
- Control power to a plugged-in relay device (such as a pump) or other household appliances.
- Switch a plugged-in lamp to On or Off.
Each Wireless Outlet Switch has two outlets: Outlet 1 and Outlet 2. When the Wireless Outlet Switch is plugged into an outlet oriented as shown below, Outlet 1 is on the left and Outlet 2 is on the right.
Prerequisites
- Ensure that the Wireless Outlet Switch is installed as directed in the Control4 Wireless Outlet Switch Installation Guide available on the Dealer Portal.
- Ensure that your project has a controller added and identified in the Control4 system.
To add and configure a Wireless Outlet Switch:
IMPORTANT TIP: When configuring the Wireless Outlet Switch, add two drivers: one for the Wireless Outlet Switch and one for the plugged-in device. In addition, define the connection between these two devices In the Connections view > Control/AV tab.
- To add the driver and identify the device see “How to add devices to a project.” Ensure that the Wireless Outlet Switch V2 driver is added to the project tree.

- Select the Wireless Outlet Switch that has been added to your project, then configure these settings in the Properties tab:
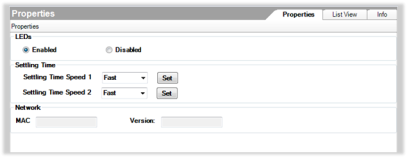
LEDs—Allows you to enable/disable the outlet indicators on top of the Wireless Outlet Switch.
Settling Time—Sets the interval following on and off commands before the system performs a status check on the device.
Network—These are read-only fields for the switch’s network settings.
- Add a driver for the device you want to plug into the Wireless Outlet Switch as appropriate for your use (power sensing, power controlling, or switching lamps on and off).
- Add the appropriate driver.
- (For an AV device only, such as a DVD Player) Edit the driver to change the power management option in the driver for the correct connection to appear in the Connections view. To do this, see the "Change Power Management Options." For other devices, it is not necessary to edit the driver.
- Before you can use power sensing for the plugged-in device, perform Power Learning on the Wireless Outlet Switch for the plugged-in device on the appropriate outlet. For information about Power Learning when using the Wireless Outlet Switch power sensing, see “Perform Power Learning” later in this section.
- Minutes Off—Minutes light has been off since going online.
- Minutes On—Minutes light has been on since going online.
- Minutes On Today—Minutes light has been on since midnight.
- Current Power—N/A.
- Energy Used—N/A.
- Energy Used Today—N/A.
Power Sensing (Contact)—Using the Wireless Outlet Switch, the system can sense the power state of the plugged-in device, and the controller can send the appropriate control commands based on the power state.
For a plugged-in device:
Power Control (Relay)—For a plugged-in device, add the appropriate driver.
Example: Add a relay device by selecting a Pump to the project. Go to the System Design view in the Items pane, select the My Drivers tab > Motorization, and double-click the Pump object.
Lighting—For a lamp, add a Non-Dimmable Light (Outlet) to the project. Go to the System Design view in the Items pane. Select the My Drivers tab > Lighting > Outlet Lighting, and double-click the Non-Dimmable Light (Outlet) object.

Note: This is the Non-Dimmable Light (Outlet) object, and not the regular Wireless Outlet Switch V2 object.
Configure the following fields:
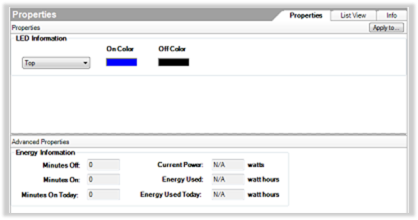
LED Information—Sets the colors of the keypad buttons that are bound to the light. Select Top, Bottom, or Toggle LED colors, based on the type of keypad button binding used.
Energy Information
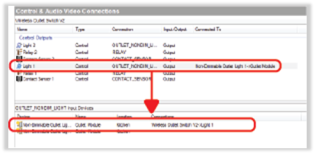
- Make a connection between the Wireless Outlet Switch V2 and the device that is plugged into the Wireless Outlet Switch. Make this connection for any of these three possible uses: power sensing (contact), power control (relay), and switching a lamp On or Off.
- In the Connections view, select the device that is plugged into the Wireless Outlet Switch.
- From the top screen, drag the appropriate connection to the Wireless Outlet Switch connection on the bottom screen.
Example: Connection between the Wireless Outlet Switch and the light outlet.