Auto Discovery (SDDP)
Auto discovery uses SDDP to automatically discover IP devices and ensure that the correct device drivers are added to a project and installed into the Control4 system. When a device uses SDDP, it can advertise on the network what it is, what driver it uses, and what its network address is.
Note: As a best practice, Control4 recommends that you add and identify the Panelized Lighting products manually rather than using Auto Discovery.
The Auto Discovery function through SDDP does these things:
- Enables devices to use DHCP (Dynamic Host Configuration Protocol) while still being able to identify them uniquely
- Enables Director to discover and identify Control4 and some third-party devices in the Control4 system
- Enables automatic installation of drivers for discovered devices
Note: Auto Discovery does not make the room connections. You must do that manually. See “Connecting and verifying devices” in this guide.
Benefits:
- It discovers devices that are not yet in the project
- It adds the manufacturer’s driver without having to search for it
- It identifies the device using a unique identifier when adding it to the project
- You don’t need to type in TCP/IP addresses or restrict devices to static IP addresses
To use Auto Discovery:
- Start Composer Pro and connect to a Director.
- Click System Design (default view).
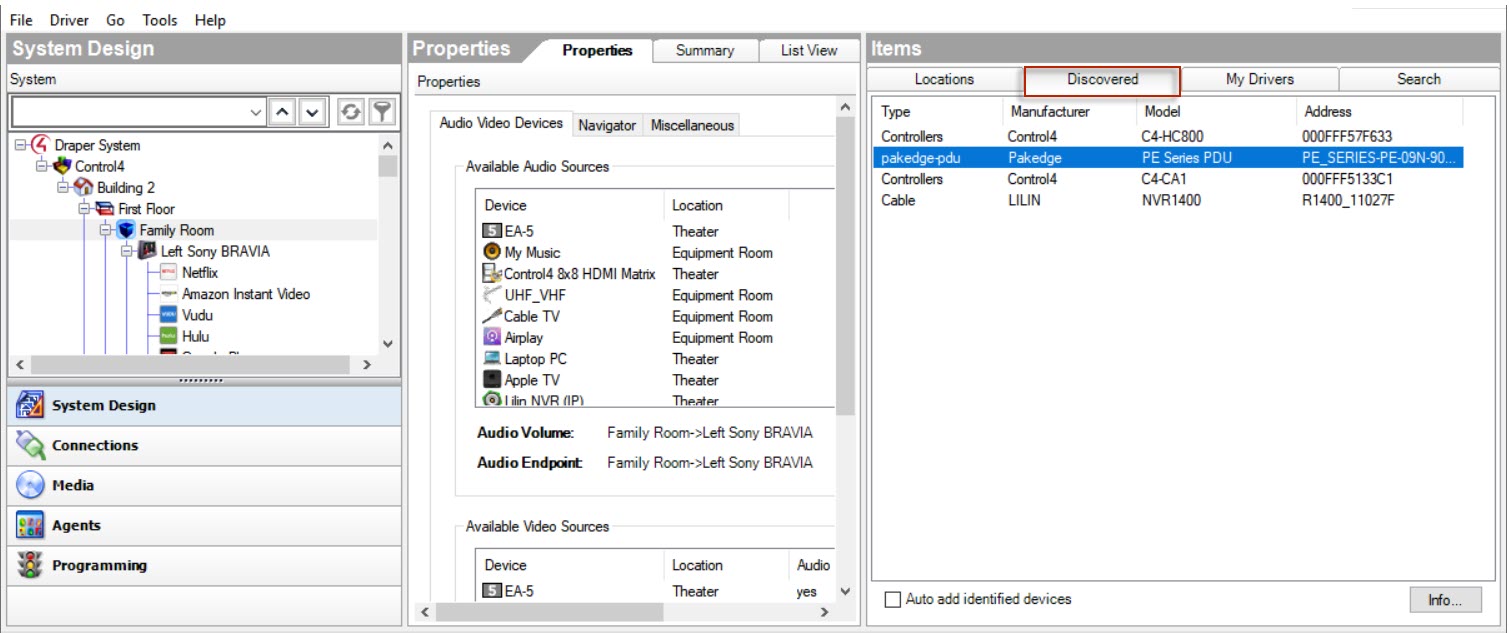
- In the Items pane, click the Discovered tab. View the devices in the list.
- In the project, click the room to add the device to.
- In the Discovered list (Items pane), double-click the device to add it to the project. If the device you want to add does not appear in the list, it may be already added to the project or it does not support Auto Discovery. If you need to add a device that doesn’t support Auto Discovery, you can use the Composer views to add and identify your device.
Add/Identify Options. Both options will add and identify a device in one step.
- Devices listed in the Discovered tab
- ‘Auto add identified devices’ box in the Discovered tab
To add discovered devices to the project:
- Double-click the device to add it to the current room in the project which will add and identify it in one step.
To use the ‘auto add identified’ box:
- Check the auto add identified devices box at the bottom of the Discovered Items pane. This allows you to go directly to the device and use the Identify button to add and identify it. This box is useful if you want to be very specific about the device you’re adding. Without the box checked, the add/identify process will not be executed with a button press.
- Press the Identify button or button-press sequence on the device.
- The device will automatically be added to the current room in the project.
Note: If the Identify button is pressed when ‘auto add identified devices’ is not selected, that device will be highlighted in yellow in the Discovered tab. It will not be automatically added to the project.
Example: If you have third-party devices, for example, three different TVs in three different rooms in the home, you can check ‘auto add identified devices,’ select the room where the TV is located, and then have someone identify at the TV. The device will be added automatically to the project.
To view all devices on the network (including those already in the project) that use SDDP:
- In Composer, click the Connections view.
- Click the Network tab.
- Notice in the right pane the list of devices. SDDP-recognized devices will have an SDDP text highlight.
To use the Info button:
- Click the Info button in the Discovered tab, or right-click the device.
- Select the device. An Info box opens which will give you identification and other information about that device (based on what the driver developer has provided).