System Design view
Use the Control4 Composer Pro System Design view (the default view when you start Composer Pro) to define the Control4 system project for a customer.
This view lets you set up the project tree by defining
- The location of the devices to set up in the project (building).
- The device you want to include in the project (device objects).
- The location of each device by room (room).
To access the System Design view:
- Start Composer.
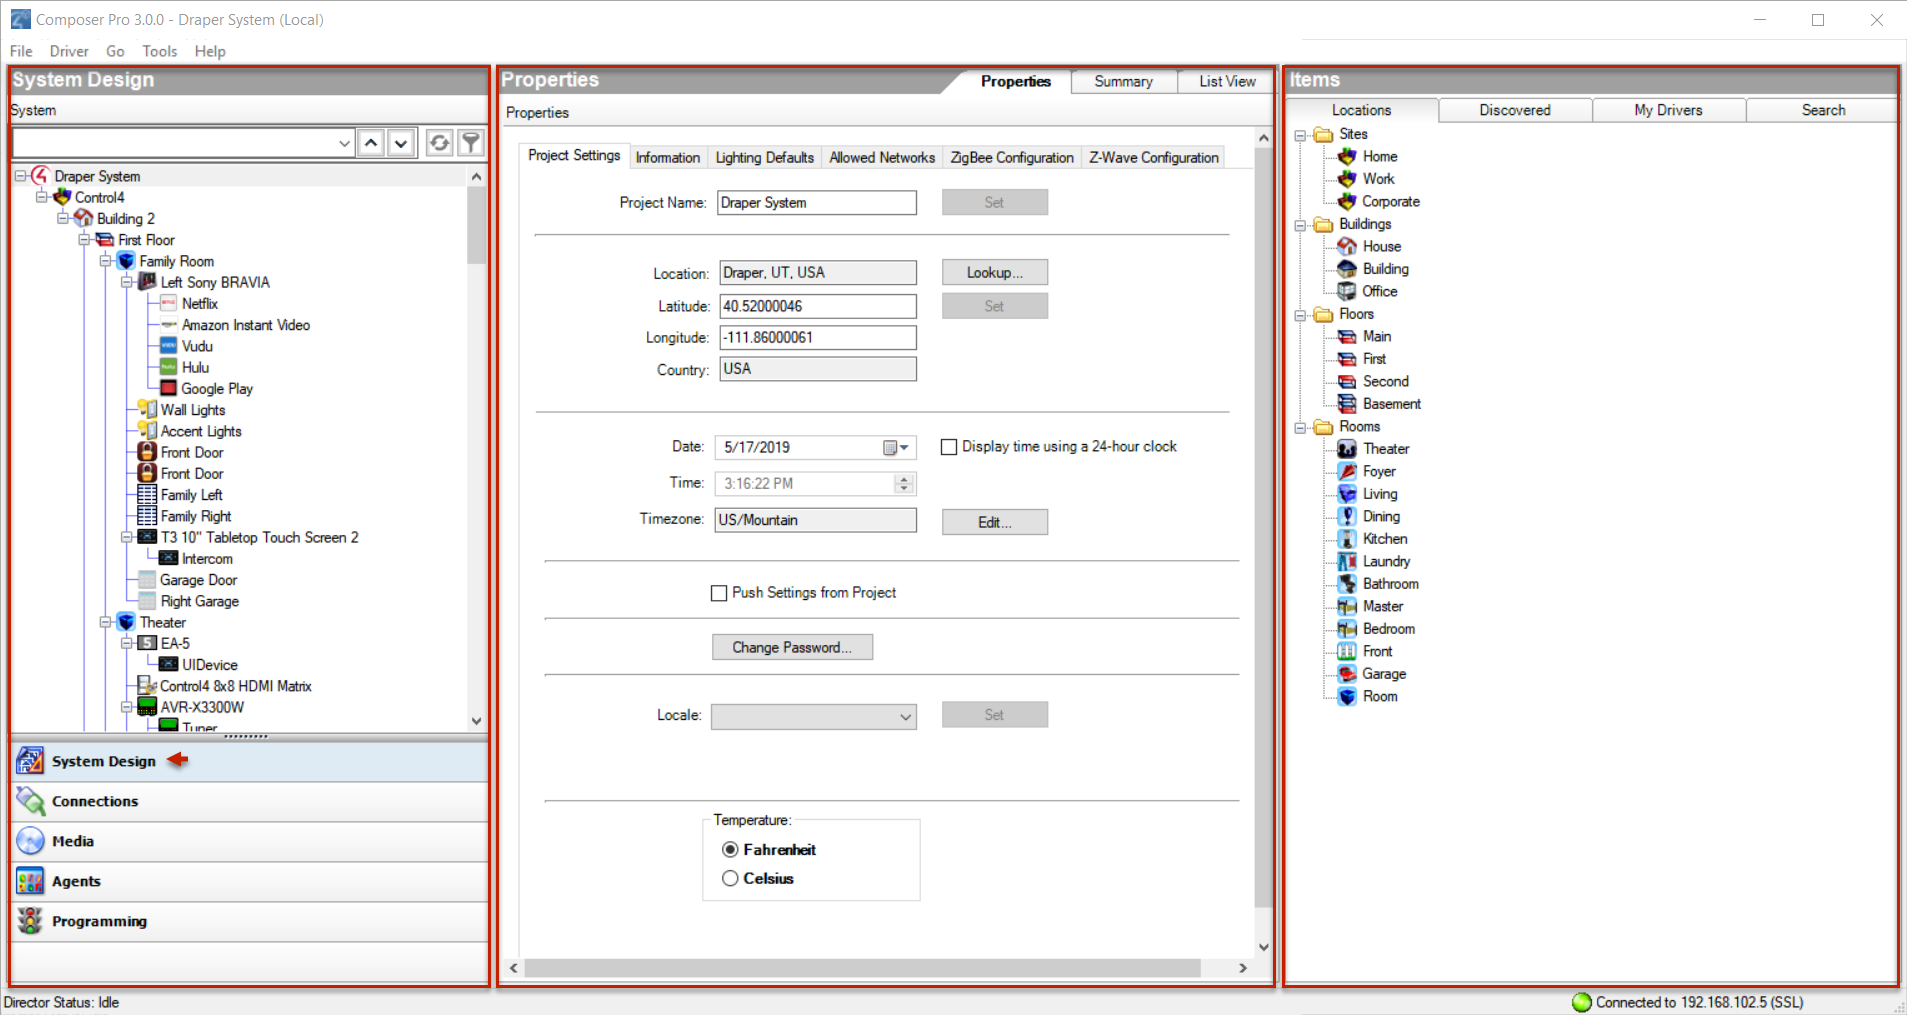
- System Design (left pane)—Contains the project tree where you build or update the project configuration with locations and device drivers. Select the room where you want the device driver to go, and then double-click a device driver in the Items pane (right side) to add it to the project tree.
- Properties (center pane)—Contains the Properties of the object you select from the project tree when you want to check or modify a device, project, and room. Refer to the sections below to view more information about the Properties pane.
- “Project Properties”
- “Room Properties”
- “Device Properties”
- Items (right pane)—Contains the items (or objects, device drivers) you use to build your project, such as locations (sites, buildings, floors, rooms) and devices (controller hardware, DVDs, TVs, receivers, lights, contacts, relays, etc.). If a device is not available in the My Drivers tab in this pane, use the Search tab to search for that device (see the Composer Pro User Guide for information about how to search for drivers). If you've created a new driver using the Driver Wizard or DriverWorks, you will find your new driver in the Search tab.
Take note of the three large panes in the screen below (System Design, Properties, and Items):
System Design pane
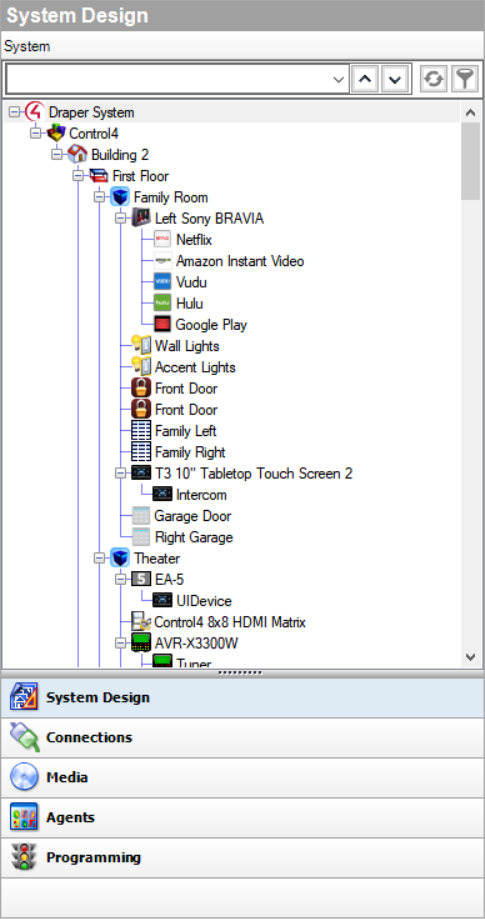
The System Design pane in the System Design view displays the project tree. You build the project by adding floors, rooms, and devices from the Items pane to the tree.
To access the System Design pane:
- Start Composer.
- Add Locations—Lets you add locations (sites, buildings, and floors) to the project tree. Double-click to select an item from the Items pane > Locations tab to move location items to the project tree. If you do not manually add the locations, Composer automatically adds generic locations.
- Add Devices—Lets you add devices (lights, VCRs, TVs, controllers, etc.) and their device driver to the project tree below the selected room. To add devices, click the location (where the device is installed) in the project tree, and then double-click a device in the Items pane > My Drivers or Search tabs (right pane) to move device to the project tree.
- For more information about how to create a project, see “Contents.”
Note: The example project tree below shows the project name (Main), site (Home), building (House), floors (Main), rooms (Family, etc.), and the devices already added to the project. If your project is new, the pane will show only the New Project icon and item. Rename your project by right-clicking the name and selecting Rename.
Use the project tree to:
Right-click on a device, room, or other item in the project tree to bring up additional options for that item.
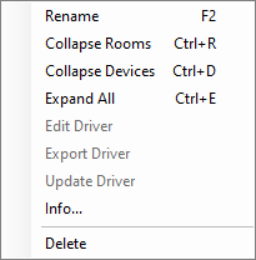
Tip: You can use Ctrl+R to collapse rooms, Ctrl+D to collapse devices, or Ctrl+E to expand all even without right-clicking.
Project tree search, sync, and filter
To make it easier to find and manage devices in large projects, the project tree has search, sync, and filter controls.
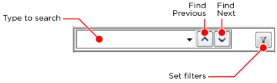
- Search—Type the device name to search for here. Click the Find Next button to jump to the next device of that name. Click the down arrow on the right side of the search box to select from previously used search terms.
- Sync—Use Sync to keep the same project device selected while switching between System Design, Connections, and Programming views. Click the Sync button and select the checkbox for the views you want to keep synchronized with the System Design view, then click Done. To clear them, click the checkboxes or click Clear All.


- Filters—Use filters to hide or show only certain types of items in the project tree. Click the Filters button, then set filters by Device Type or Category. The Device Type list contains only device types already included in your project. Setting a filter under Device Type will clear any filters already set in Category, and vice versa. To clear all filters, click Clear All Filters.


Device Control window
The Device Control window in System Design lets you test and control a physical device (after identifying the device and making its connection) in Composer Pro to make sure it works in the system.
Note: You must define the connections before you test or control the devices. See “Testing the device connections” for information about how to make the connections.
Example: To use the Device Control for a dimmer, you click a button in the Device Control window to turn the dimmer on or off and change the light level. If the physical light changes also, you know the dimmer driver is added and the basic connections are made correctly.
To access the Device Control window:
- Start Composer. The System Design view appears.
Double-click the device in the project tree to access the Device Control window (see below) for that device.
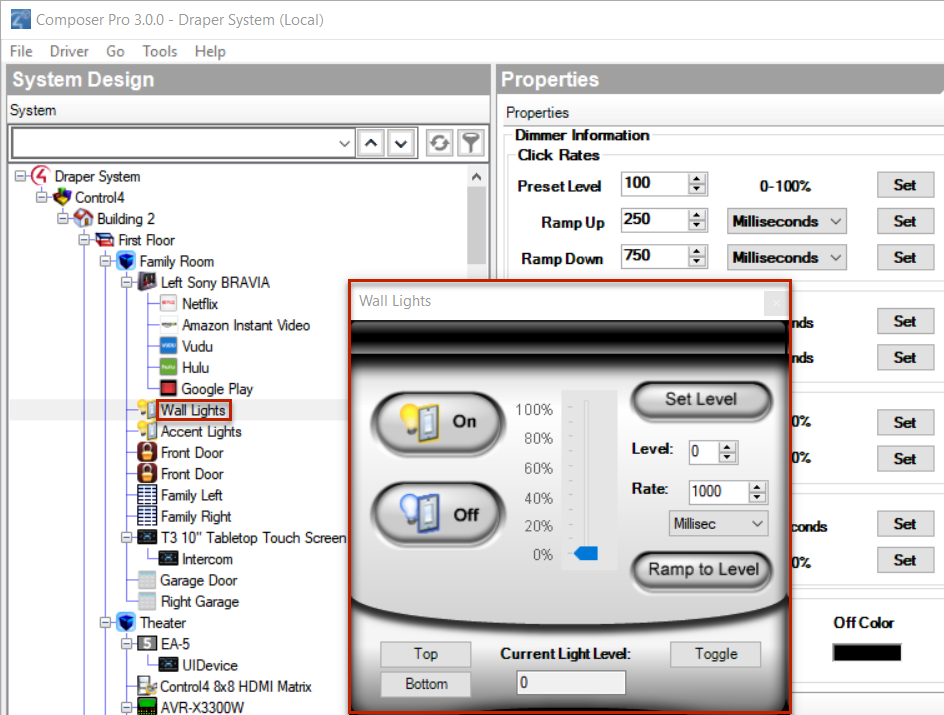
This window lets you change the configuration parameters (temporarily) and control a device. Later, you can set the parameters permanently in the Properties pane or Programming view.
Example: You can adjust and test the ramp rate of a dimmer to determine the desired ramp rate to set during programming.
Properties pane
In the System Design view, click the project name in the project tree to view the Properties pane (center pane).
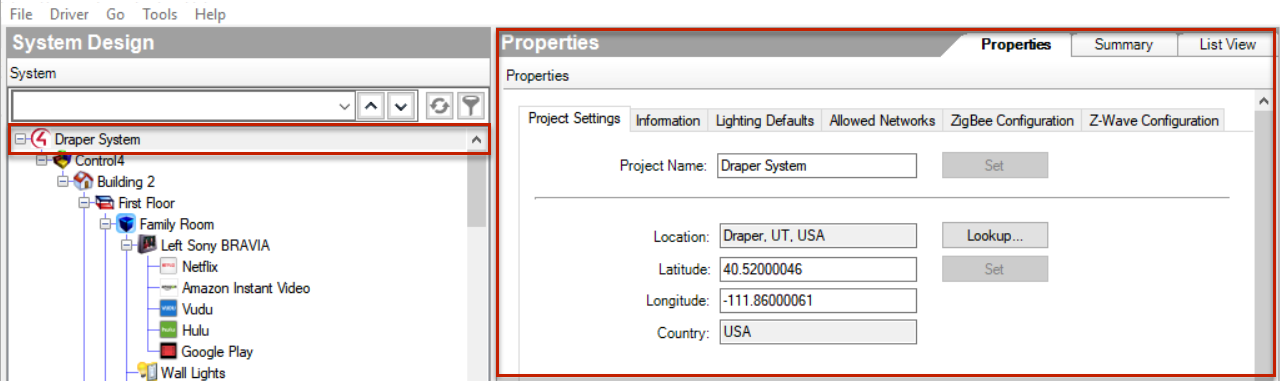
The project Properties appear when you first start Composer Pro, or any time you select the project name (or root node) in the project tree. Different properties appear depending on the item you select.
This option lets you enter project-specific information; for example, the project name, location, and ZIP Code. Composer Pro automatically enters the latitude/longitude and date/time information after you provide the location and ZIP Code.
|
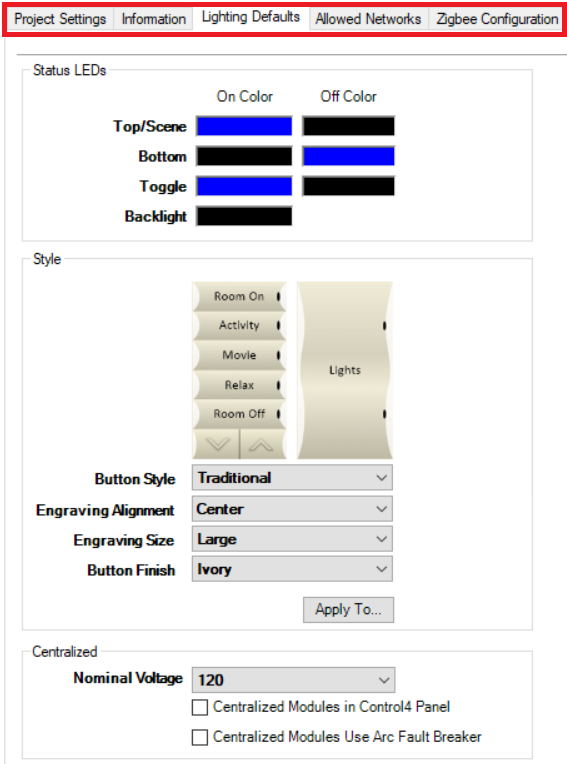
Lighting Defaults tab |
|
|---|---|
|
Category |
Boxes or Buttons |
|
Status LEDs—Lets you set default LED colors for switches, dimmers, and keypads. |
Top/Scene—Set the default On and Off color for Top buttons and lighting scenes in the project. Bottom—Set the default On and Off color for Bottom buttons on devices in the project. Toggle—Set the default On and Off color for buttons configured to toggle lights or scenes in the project. Backlight—Set the default backlight color for devices with backlights in the project. |
|
Style—Lets you set default engraving style settings for each device in the project. |
Button Style—Set the default Button Style for devices in the project, Traditional or Contemporary. Engraving Alignment—Set the default alignment for engravings: Left, Center, or Right. Engraving Size—Select the default engraving text size: Large or Standard. Finish—Select the default button finish for devices in the project. Finish styles include: White, Light Almond, Ivory, Brown, Black, Aluminum, Snow White, Biscuit, and Midnight Black. Available finish styles may vary.
Apply To...—Click Apply To... to apply the current lighting styles to desired devices in the project. Click next to a device, room, or the whole project to select the desired devices to change, and then click Apply. |
|
Centralized—Lets you set default settings for Centralized Lighting devices in the project. |
Nominal Voltage—Set the default voltage for all Centralized Lighting devices in the project. Centralized Modules In Control4 Panel—Set the default setting if your Centralized Lighting modules are in a Control4 panel or not. Centralized Modules use Arc Fault Breaker—Set the default setting if your Centralized Lighting modules use an arc fault breaker. |
|
Allowed Networks tab |
|
|
Category |
Boxes or Buttons |
|
Subnets |
By default, it is not possible to identify a device that resides on a different network (e.g., subnet) because Director actively excludes identification broadcasts received from devices on a different network.
You can expand the list of allowed networks by adding one, or more, CIDR network specifications to the following list.
For example: 192.168.2.0/24
For more examples see: https://en.wikipedia.org/wiki/Classless_Inter-Domain_Routing |
|
Zigbee Configuration tab |
|
|
Category |
Boxes or Buttons |
|
Edit Zigbee Configuration |
Click on this link to define, edit, and move Zigbee mesh configurations. |
|
Refresh |
Click on this link to refresh the Zigbee status view below. |
|
Zigbee Network Status |
Use this view to see the status of the Zigbee mesh(es) in your project. Name—Name of the device configured in the Zigbee mesh. Controller Status—The colored icon shows an at-a-glance status of the Zigbee network. Green for online, Yellow for offline, Red for error. Zigbee Server—The controller defined as the Zigbee Server will say “Enabled”. Zigbee Status—Shows the status of the Zigbee Server. “Running” means the Zigbee Server is configured and running. Channel—The current channel of the Zigbee mesh. ZAP Status—A controller configured as a ZAP will show as “Coordinator” or “Enabled”. |
|
Z-Wave Configuration tab |
|
|
Category |
Boxes or Buttons |
|
Advanced |
Use the Learn, Network Update, Reset Defaults, and Send Node Info buttons to manage your Z-Wave network. See the Z-Wave Setup Guide for more information (ctrl4.co/z-wave-sg) |
Room Properties
The room Properties (System Design > Room > Properties) appear when you select a room in the System Design project tree.
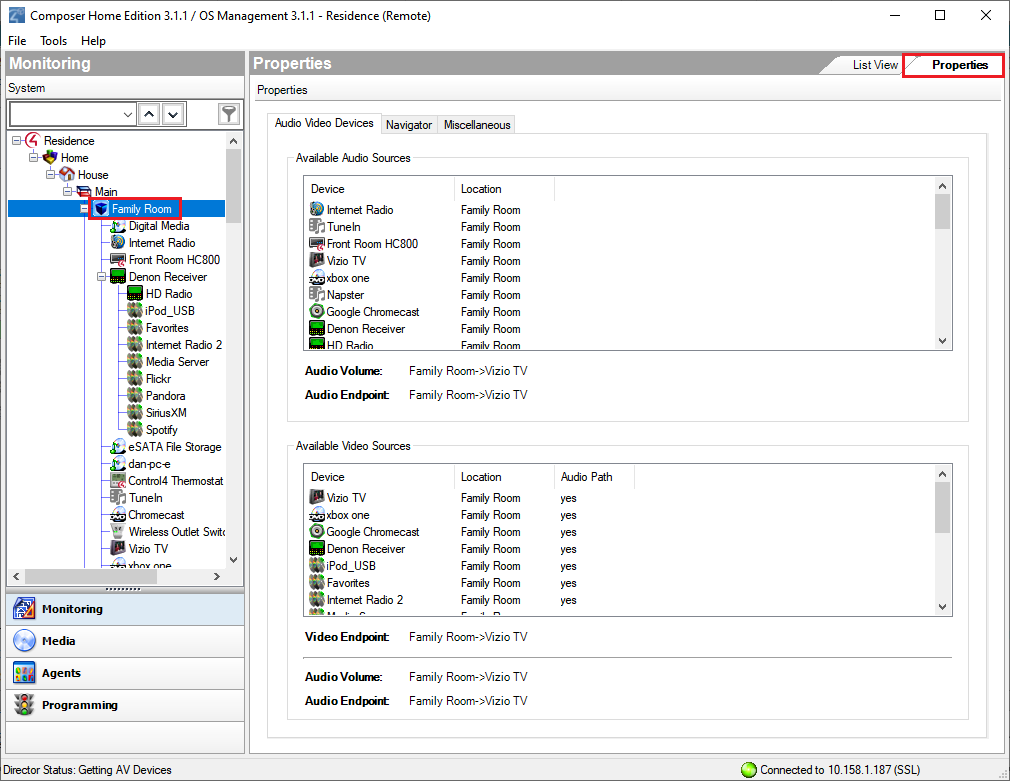
The room Properties pane lets you view room-specific device and media information (for example, the iPod located in the Office is an available audio source in the Family room), and helps you troubleshoot any incorrect room connections.
The Audio/Video Devices tablets you view the devices configured for each end point device and the devices that are available in the room.
Example: If you can’t play movies from a Disc Changer in a particular room, you can view the room’s Properties to see if the disc changer shows up in the List view. If it does not, you are probably missing AV bindings in the path to the device. Detailed information about connections is available in the Composer Pro User Guide, or see “Connections view.”
Room Summary
The room Summary (System Design > Room > Properties) appear when you select a room in the System Design project tree and click on the Summary tab..
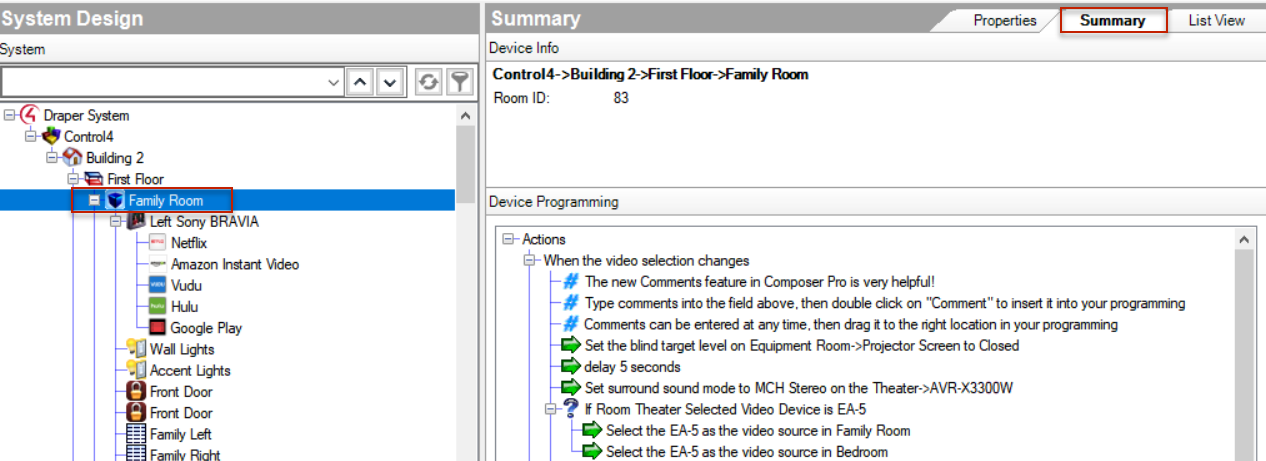
This screen gives useful summary information for the room including room location in the project, Room ID (which can be helpful when reviewing project logs), and Device Programming that pertains to the room.
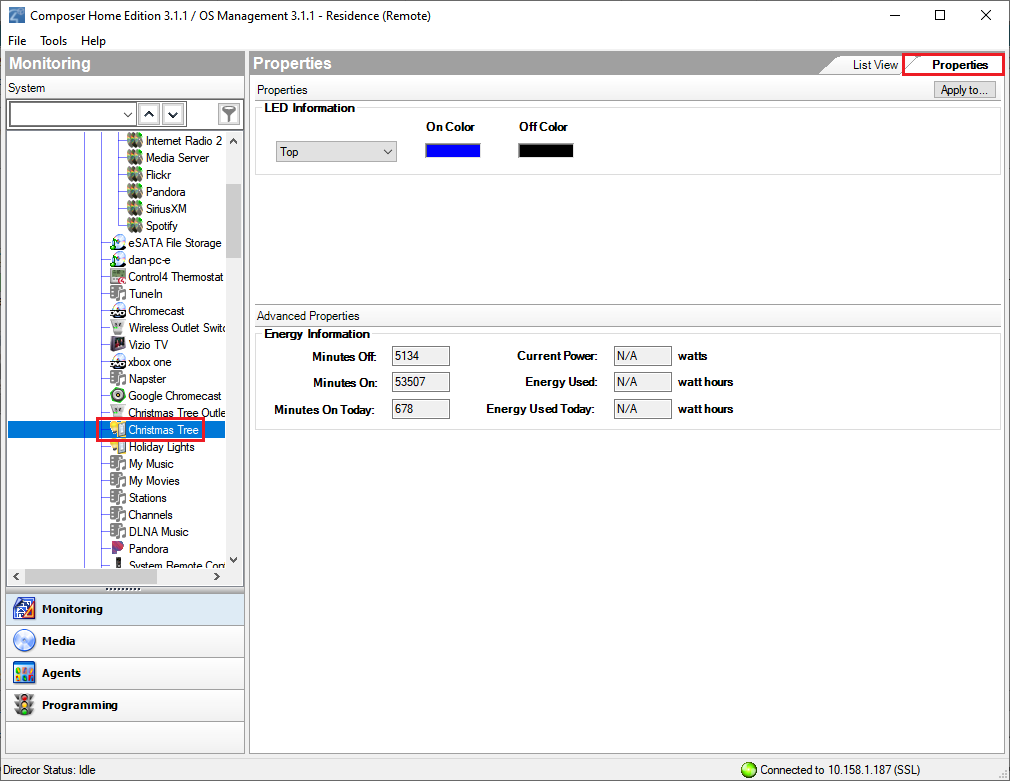
Device Properties
The device Properties (System Design > device > Properties) are visible when you select a device in the project tree. This option lets you modify the available (if any) user options for the selected device.
|
Properties Pane: Device Properties |
|
Category |
|
Properties—Lets you modify options (if available) that are common to all devices of that type.
Advanced Properties—Lets you modify advanced options (if available) on some devices. |
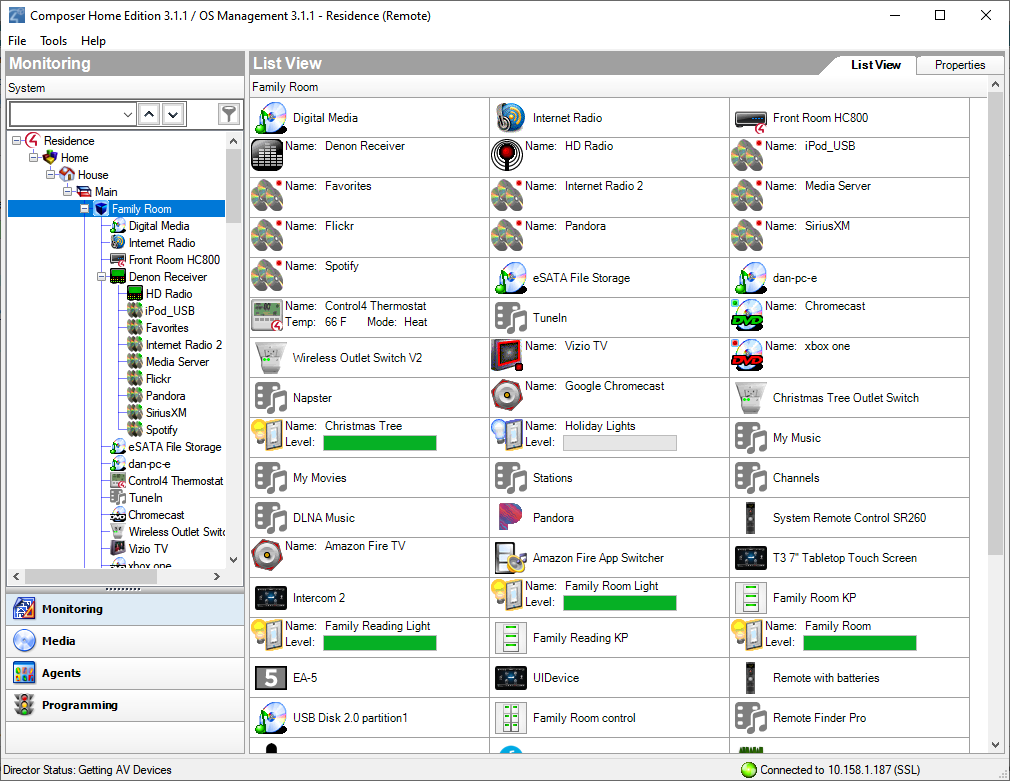
List View pane
Use the Control4 Composer Pro List View pane in System Design to view all of the devices in a room.
When you select a room or any device in a room in the project tree, and then click List View, all of the devices installed in that room display; for example, notice all of the devices installed in the Family room (shown below).
Note: The List View shows all the devices in a given area and the current state of contact inputs or other devices. When selecting the site, building, floor, or room, all of the devices associated in that area are visible. If a single device is selected in the project tree, List View shows all devices that are in the same room.
To access the List View pane:
- Start Composer.
- In the project tree, click any object.
- In the Properties pane, click the List View tab.
- You can double-click a device in the List View pane to display its Device Control window.
Items pane
The Control4 Composer Pro Items pane lets you build the project tree either by:
- Dragging and dropping items from the Items pane to the project tree, or by
Note: In OS 2.3.0 or later, specific devices can be added and identified in the project tree automatically using the Discovered tab (via SDDP). See the figure below and the Composer Pro User Guide for details.
To access the Items pane:
- Start Composer Pro. The System Design view appears by default.
- View the Items pane on the right side.
- Click the Locations tab.
- Click the Discovered tab.
- Click the My Drivers tab.
- To locate a driver that is not in the common list, click the Search tab. If you can't find the driver you want here, you may need to create your own driver. See “Search tab” for details about how to use the Search function.

The Locations tab displays the list of available objects by their physical location in the home (site, building, floor, or room) that you can add to a project. Use the items in the Locations tab to organize the project tree by area.
Example: The Sites object shows which sites (Home, Work, Corporate, etc.) you can add to your project tree as you begin to build your design.

The Discovered tab (supported for devices added in OS 2.3 and later) lists the devices that can be automatically discovered by the system. You simply click where in the project (room) you want the device to go (left pane), and then double-click the device in the list; it will be added and identified automatically. See “Configuring devices” in the Composer Pro User Guide for details. This feature is ideal for smaller systems.
The My Drivers tab displays a list of device drivers you can add to the project tree. This is a list of common Control4 and third-party device drivers. If you can't find the driver you want, go to Step 6.
The Search tab lets you search for drivers that don't appear in the My Drivers tab.
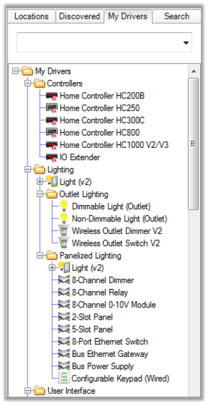
My Drivers tab
Use the My Drivers tab to add Control4 and popular third-party device drivers to the project tree.
To access the My Drivers tab:
- Start Composer Pro and connect to a Director.
- In the project tree, click the room to add the driver to.
- Click to expand a category, and type in the search box to search for a device name.
- Double-click a device driver in the list to add it to the project tree. For information about configuring devices after adding them to the project tree, see "Configuring devices" in the Composer Pro User Guide.
- The My Drivers list is only a set of common devices. If you do not see the device driver you need, you can find and add device drivers to the My Drivers list using the Search tab.
In the Items pane (right side), click the My Drivers tab. A list of devices appears.
If you select a generic device, a dialog box with a list of devices appears. Select a specific model to add it to the project tree. If you can't find the device driver you need, you can either modify an existing one or create a new one. See the Composer Pro User Guide for details.
My Drivers options
If you right-click any device driver in the My Drivers list, the following options display:

- New Folder—Create a new folder in the My Drivers list.
- Rename Folder—Rename an existing folder.
- Collapse Folders—Close all folders.
- Expand Folders—Open all folders to expose the items.
- Add Driver—Add a driver to the My Drivers list..
- Delete—Remove an existing driver from the My Drivers list.
- Move Up—Move the item up the list.
- Move Down—Move the item down the list.
- Save List—Save the My Drivers list.
- Load List—Load a saved list.
- Add from Defaults—Add a driver from the default list.
- Restore Default List—Restore the device list to the default contents.
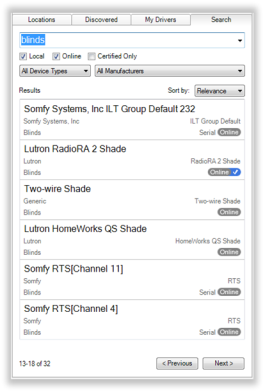
Search tab
Use the Search tab to search for and add device drivers to the project tree that do not appear in the My Drivers list.
To find a device driver using Search:
- Start Composer Pro and connect to a Director.
- In the project tree, click the room to add the driver to.
- In the Items pane, click the Search tab.
To find a device driver:
- From the project tree, select the room where the device resides.
- In the Search tab, type the text to search for in the search box. As you type, matching options are displayed.
- To narrow down the search, select the device type and the manufacturer from the respective filters.
- Drag the driver to the project tree, or double-click the device driver to add it the project tree.
- [search text field]—Type the text to search for here. You can use the drop-down menu to select terms that were previously typed.
- Certified Only—This checkbox specifies that only Control4-Certified drivers will appear in the search results.
- Device Types—Lets you select the device type (proxy), for example, AV Switch (includes audio switches), Blinds, CD, Disc Changer (includes DVD and CD Changers), DVD, Light, Receiver, Satellite (includes DVRs), Cable TV, Television, Thermostat, Tuner, VCR and more.
- Manufacturers—Lets you select the manufacturer.
- Results—Detailed search results appear, including the manufacturer, model, and driver location.
Locations tab
Use the Locations tab to add the list of available locations (site, building, floor, room, etc.) to a project.
To access the Locations tab:
- In the project tree, click the site, building, or floor where you want to add the location.
- In the Items pane (right side), click the Locations tab.
- Double-click a location in the Locations tab to add it to the project tree.
Click Sites, Buildings, Floors or Rooms to expand the category.

- Sites—Define the project site type. Defines the main location, and identifies the type of system you are designing, for example, a residence, commercial, or corporate site.
- Buildings—Place the buildings on the site (House, Building, Office, etc.). Defines the buildings located on the site. For example, a residence might have a separate Garage, Workshop, Shed, or Pool house. A Campus might have a building for each college.
- Floors—Add the floors in each building (Main, Second, etc.). Lets you describe the various floors in each building, for example, Main and Basement or First, Second, and Third floors.
- Rooms—Add the rooms on each floor (Bedroom, Bathroom, etc.). Lets you describe the various rooms on a floor, for example, Kitchen, Living Room, Great Room, Master Bedroom, Laundry Room, etc.
Info pane
Use the Info pane in System Design to view information about the system owner and Control4 dealer.
Tip: Some of the information you enter here is added to the touch screens, Control4 apps, or on-screen navigators (More > Settings > About) in Release 2.0 or later. For example, the longitude and latitude display the outside temperature on a touch screen, Control4 app, or on-screen Navigator.

To access the Info pane:
- In System Design, click the Info tab.
- View, add or change existing information about the system owner or dealer in each box.
- Check and change the data periodically as needed.
The Info pane lists:
- Name
- Address
- Phone
- Email address
- Name
- Address
- Phone
- Email address
- Primary Contact
- Lead Installer
- Original Install Date
- Date of Last Update