Composer Pro menu options
When you start Composer Pro and connect to Director, the menu bar appears at the top of the Composer screen.

The menu bar provides the following menu items:
- File—Lets you perform typical file management tasks, clear or load projects, connect or disconnect to the local Director, update both the Composer and Navigator software, and exit Composer.
- Media—(only appears when the Media view is selected)—Lets you perform tasks regarding music and media lists.
- Go—Lets you access the various Composer Pro views, including System Design (Ctrl+1), Connections (Ctrl+2), Media (Ctrl+3), Agents (Ctrl+4), and Programming (Ctrl+5).
- Tools—Lets you view Network Tools, System Manager, Zigbee Health, Device Logs, Detective Suite, Reports (if installed), System Diagnostics, Account Services, and Update Manager.
File menu
Access the File menu from the menu bar on any Composer screen.
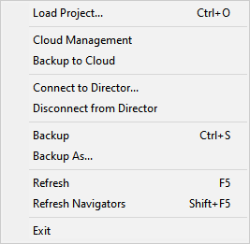
From the File menu, you can perform project file management tasks:
- Manage the project (clear, load, back up, etc.).
- Manage cloud backups.
- Connect to Director.
- Refresh Composer Pro.
- Refresh the Navigators: touch screens, Control4 apps, or on-screen Navigator.
- Validate Project
The file management options apply to the files you back up on your computer called project files (project name plus a .c4p extension). Project files are saved by default to the My Documents directory under Control4/Projects.
When you set up a Control4 system, you create project configuration information. This information is created live on the controller hardware, or backed up to a project file on a computer that lets you save specific information about each system, including devices, connections, configuration, programming information, and media. The project configuration is automatically stored on the controller hardware to which you are connected from your computer.
Backing up the project lets you save a copy of the project on your computer which is always recommended whenever you make changes in Composer Pro or update the system.
The following options are available:
- Clear Project—Removes any project configuration from the hard drive on the controller. Composer Pro prompts you for a backup before erasing the project configuration information to present a blank project. Use this option with caution.
- Load Project—Loads a selected project into the currently-connected controller. Composer Pro prompts you for a backup before it clears the project configuration information, and replaces it with a selected project you can browse to and load.
- Cloud Management—Manage online backups saved from the registered system. You can load a cloud project to the controller, delete a cloud project, add a project to the cloud, show a history of cloud backups for this project, and save a cloud project to your local computer.
- Backup to Cloud—Creates a backup of the project and saves it to Control4 online services. Requires a valid 4Sight subscription.
- Connect to Director—Connects you to a Director residing on the controller. When you connect, project configuration information from the controller is presented to the screen in Composer Pro.
- Disconnect from Director—Disconnects you from a Director. Composer prompts you to back up your project before disconnecting you from the currently-connected Director. This option is available when connected to a Director.
- Back up—Backs up the current project to your computer. The first time you back up your project, Composer prompts you for a filename. It also prompts you to back up any media information. If you select this option, the current project becomes an option in the File > Load Project list.
- Back up As—Backs up the current project, and prompts you to enter the name of the file. It also prompts you to back up any media information. If you select this option, the current project becomes an option in the File > Load Project list.
- Refresh Navigators—Refreshes the Navigators connected to the system. Note: Control4 for PCs and tablets must be updated in that app. Control4 for iPhone, iPod touch, iPads, and Androids will update if online.
- Validate Project—Performs a check for project file integrity.
Media menu
Access the Media menu from the menu bar in the Media view.
Note: The Media menu becomes available when the Media tab is selected (on the left menu).
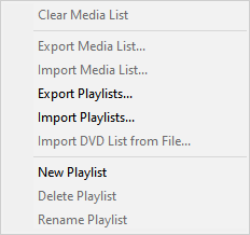
From the Media menu, you can create, delete, and rename playlists. You can also clear, export, and import media lists. A Media List is the list of media information associated with the selected device, for example, all DVDs with associated cover art, title, notes, etc., for each DVD in a disc changer.
The media has been scanned or manually added to the media database. After you add an item to the media database, the cover art and information about the media can be viewed and selected from any of the Navigators (touch screens, Control4 apps, and on-screen navigators, etc.).
The following options are available:
- Tag media files—Used for OS 2.0 or later conversion of media files so all media players can see the same tags.
Driver menu
Access the Driver menu from the menu bar on any Composer Pro screen.
Note: You may prefer to use the new Driver Editor tool released in 2012. Check with your Control4 Sales Representative for details.

From the Driver menu, you can create, copy, or edit drivers. You can also manage the local database of drivers and add other drivers from the online database as needed.
Note: Creating a new device driver is an advanced procedure. See "Creating device drivers" in the Composer Pro User Guide for details.
The following options are available:
- Create New Driver—Launches the Driver Wizard and lets you create a new driver based on the typical features of a particular device type, such as DVD players, and TVs. See “Create, copy, and edit drivers with Driver Wizard.”
- Copy Existing Driver—Launches the Driver Wizard and lets you copy an existing driver model. For example, if a driver exists for a device from a particular manufacturer, but it isn’t the same model, you can modify the driver for the model you need. See “Create, copy, and edit drivers with Driver Wizard.”
- Edit Existing Driver—Launches the Driver Wizard and lets you modify an existing driver. This is mostly for testing purposes. After you create a driver, you can test the driver by adding it to the Control4 system to see if it functions correctly. The Edit feature allows you to make modifications when necessary. See “Create, copy, and edit drivers with Driver Wizard.”
- Add Driver—Lets you search the local database to add a .c4i driver if it doesn't exist in the project. Director will load the new driver, but you will have to add the driver to the project. You can use Update Driver to replace an existing one. This option is used mostly with DriverWorks. See Composer Pro User Guide for details.
- Manage Drivers—Lets you manage drivers in your local database and the drivers on the My Drivers tab. See “Manage Drivers dialog.”
Tip: You can also right-click the driver in the project tree to: Rename, Edit Driver, Export Driver, Update Driver, or Delete a driver. For OS 2.0 or later, use the same procedure for Update Driver as with Add Driver (see above). However, Update Driver updates your driver if it IS in your project. Note: If the driver connection IDs change, the driver will need to be connected again. Double-check your connections after you update your driver.
Manage Drivers dialog
Access the Manage Drivers dialog from the Driver > Manage Drivers menu item on any Composer Pro screen.
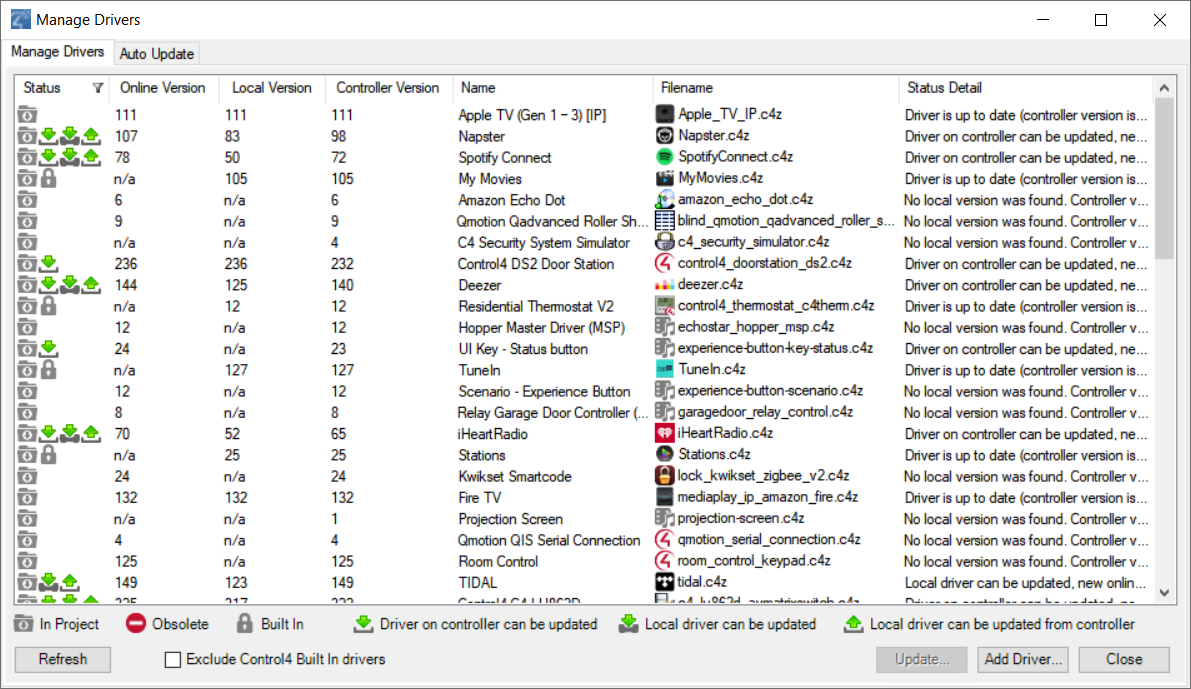
From the Manage Drivers dialog, you can organize the device drivers (or drivers) in your local database. You can sort by Device Type, Name, Manufacturer, Model, Driver Status, Creator, Created Date, and Modified Date.
Buttons
- Add—Lets you add drivers from the Control4 online database to the local driver database (Local Database). When the dialog appears, from the pull-down menus, select the Device Type and Manufacturer of the device you want to download, and then click Search. Check the driver you want to add to the local driver database, and click OK. This adds the device driver to your local database.
- My Drivers—Lets you add the selected driver to the My Drivers list. In the Manage Drivers dialog, you select a device or use the Shift (to add multiple drivers) or Ctrl keys (to add multiple drivers all in a row).
Other options
- Sort—Lets you sort and find drivers by column and by Device Type, Name, Manufacturer, Model, Creator, Created Date, and Modified Date. Click the top of each column to sort accordingly. Click on the column head to sort the column.
Create, copy, and edit drivers with Driver Wizard
To enhance device support in Composer Pro and in the Control4 system, a device needs a corresponding driver, known as a device driver.
If you want to add a device to the Control4 system, and it does not have a supporting driver (or one that you can find in the online database), you can use the built-in Driver Wizard in Composer Pro to create a driver prior to setting up the device.
You can access the wizard from the Driver menu > Create New Driver.
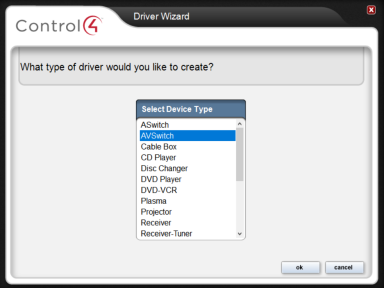
The Driver Wizard lets you add device support to the system for infrared (IR) or serial drivers.
For more information and example implementations, see “Overview of creating device drivers” and “Using the Driver Wizard” in the Composer Pro User Guide.
Go menu
Access the Go menu from the menu bar on any Composer Pro screen.
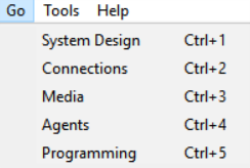
From the Go menu, you can access the various Composer Pro views: System Design (Ctrl+1), Connections (Ctrl+2), Media (Ctrl+3), Agents (Ctrl+4), and Programming (Ctrl+5). This is an alternative to using the buttons (left side at the bottom).
The following options are available:
- System Design—Lets you build the project tree and identify the devices in the Control4 system. Access this view with the keyboard shortcut Ctrl+1.
- Connections—Lets you identify all connections (Room, Control, AV, Network). Access this view with the keyboard shortcut Ctrl+2.
- Media—Lets you add and scan stored or broadcast media. Access this view with the keyboard shortcut Ctrl+3.
- Agents—Lets you set up agents for use on the system and programming. Agents include: Lighting Scenes, Wakeup, Scheduler, Variables, etc. Access this view with the keyboard shortcut Ctrl+4.
- Programming—Lets you program devices and agents on the system. Access this view with the keyboard shortcut Ctrl+5.
Tools menu
Access the Tools menu from the menu bar on any Composer Pro screen.
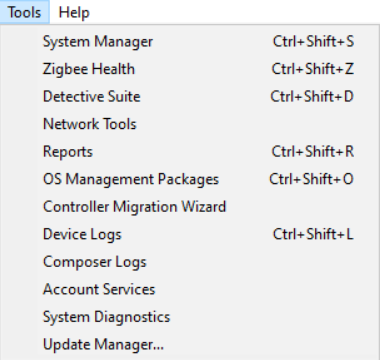
From the Tools menu, you can access tools for checking the device connection status.
The following options are available:
- System Manager—Launches a tool to connect to and configure Control4 Controller hardware and devices. See “System Manager.”
- Zigbee Health—Open the Zigbee Health diagnostic view. See"Zigbee Health."
- Detective Suite—Launches a suite of diagnostic tools: Bindings, Discovery, Performance, Programming, and Zigbee.
- Network Tools—Launches the Connections > Network view. Composer shows the status of all network devices on the IP Network and Zigbee Network. The Network view shows you which devices in your project are identified and communicating to the network.
- Reports—Lets you select one of the Centralized Lighting reports to run: Panel Report, Module Report, or Load Schedule Report. See “Reports” in the Composer Pro User Guide for details.
- Device Logs—Download a snapshot of device logs from controllers, touchscreens, or Triad One streaming amplifiers.
- System Diagnostics—Assists you in gathering system information to help you determine if any issues encountered are configuration problems, performance issues, or potential defects. The System Diagnostics tool is valuable also for logging information and sending email to Control4 Technical Support. See “System Diagnostics.”
- Account Services—Facilitates system registration which is required for software updates and to use the media services throughout the Control4 system. It is also required in conjunction with a customer account to enable Remote Access, which allows secure access to your system via the Internet. See “Account Services.”
Network Tools
The Network Tools menu option shows the Connections > Network view which offers network information on IP and Zigbee devices.
From the Tools menu, select Network Tools.
The Network tabs describe the following:
- Zigbee Network—Lists information about the Zigbee devices.
- Z-Wave Network—Lists information about the Z-Wave devices
The icons denote the following:
- Green—Indicates that an address is identified and the device is online. For example, a dimmer is identified and communicating to the Control4 system.
- Yellow—Indicates that an address is identified and the device is offline. For example, if the System Remote Control goes to sleep, the status turns yellow. This indicates that the System Remote Control has been identified, but it is offline.
- Red—Indicates that a device is not identified or has been offline for a long period of time. In this case, go to the Connections view > Network tab and identify the device to the system.
The Network Tools tabs are shown below.
IP Network tab
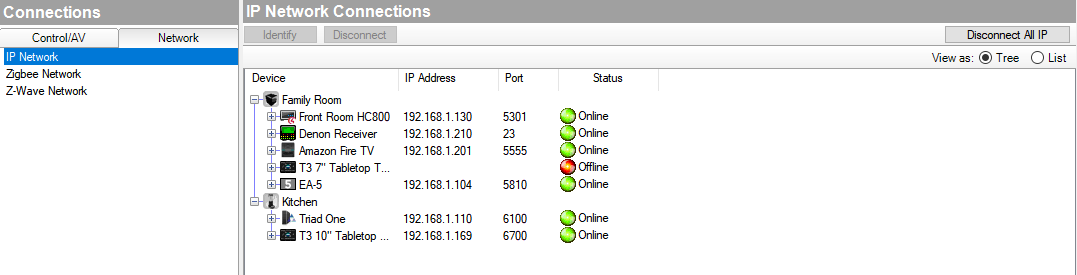
This shows the IP devices on the network, network addresses, and status.
Zigbee Network tab
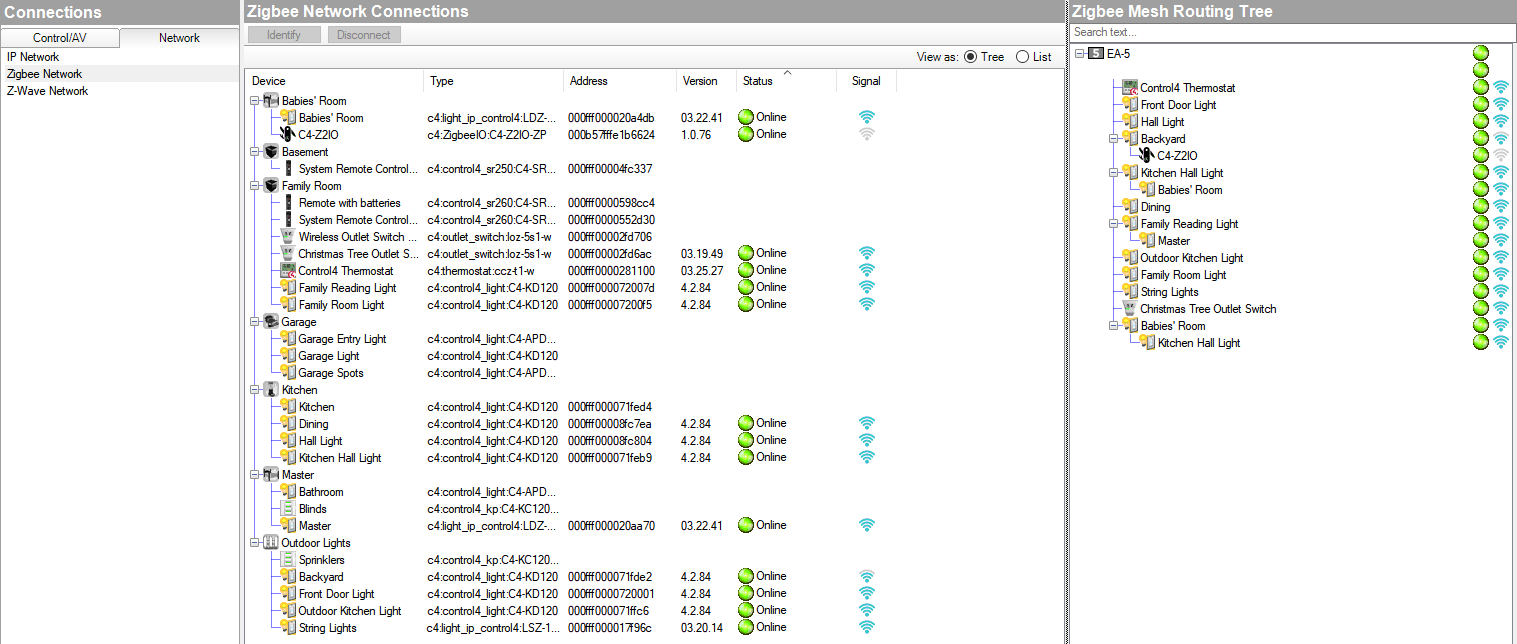
This tab displays Zigbee devices, addresses, online states, and signal strengths
You can view the Zigbee network items two ways using these radio buttons:

- List—Takes the devices that are in the project and lists them in one list.
Detective Suite
Use the Detective Suite in Composer Pro to perform diagnostic tests on the system.
From the Tools menu, select Detective Suite. The following window appears with tabs for Connections and Programming.

Tab descriptions:
- Connections—Lists all the connections in the project. Lets you search by keywords, and expand by room or the whole house. In the Connections tab, if you right-click on an item, more menu options are available.
- Go To Device—Goes to the selected connection in the Connections view of Composer.
- Expand All—Expands all the items and rooms in the list.
- Collapse All—Collapses all the items and rooms in the list.
- Refresh—Refreshes the connections and rooms in the list.
- Disconnect—Disconnects the selected connection.
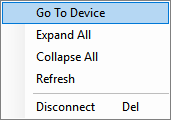
- Programming—Shows programming that has been created. Lets you search by keywords, and expand by room or the whole house. Can expand the events to include actions. In the Programming tab, if you right-click on an item, more menu options are available.
- Go To Device—Goes to the selected event in the Programming view of Composer.
- Expand All—Expands all the items and rooms in the list.
- Collapse All—Collapses all the items and rooms in the list.
- Collapse to Events—Collapses all the items and rooms in the list to only show events with programming defined.
- Refresh—Refreshes the connections and rooms in the list.
- Remove—Removes the programming script items from the selected event.
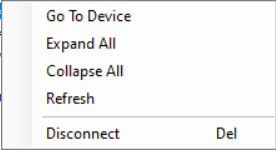
System Diagnostics
From the Tools menu, click System Diagnostics. Use these screens to help you diagnose system problems and activity.
- Controller Performance tab—Lets you view controller performance information, including CPU and memory usage. Process data is listed in the bottom pane.
- Controller Networking tab—Lets you view controller networking information, including network type, connection status, MAC address, IP address, Subnet mask, Gateway, DHCP status, and DNS server information.

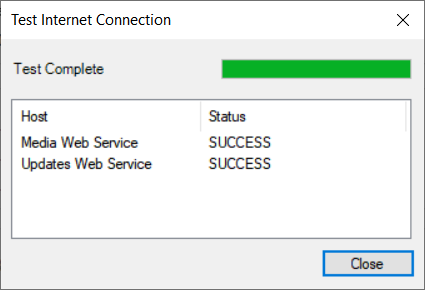
- Test Internet Connection button—Lets you test the current Internet connection. After viewing, click Close to exit the dialog box.
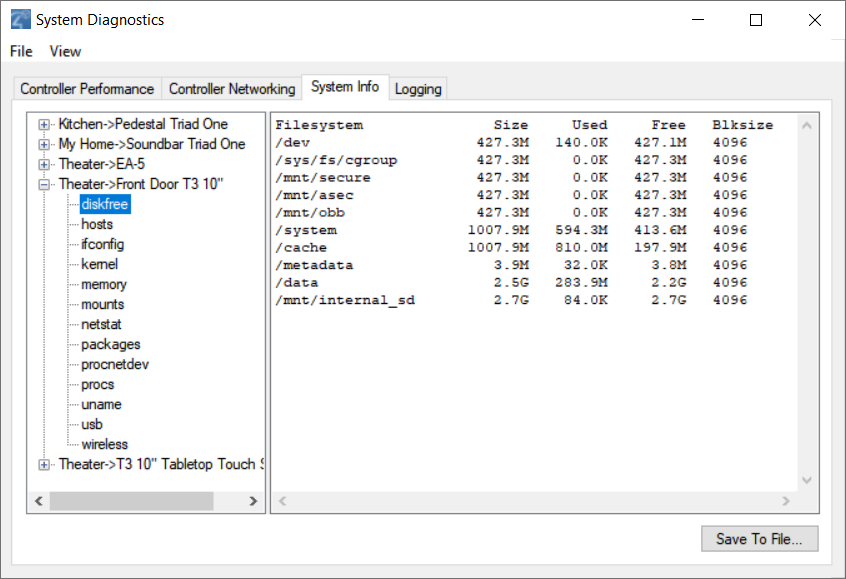
- System Info tab—Lets you view system information in a tree view. Click Save To File to save this information.
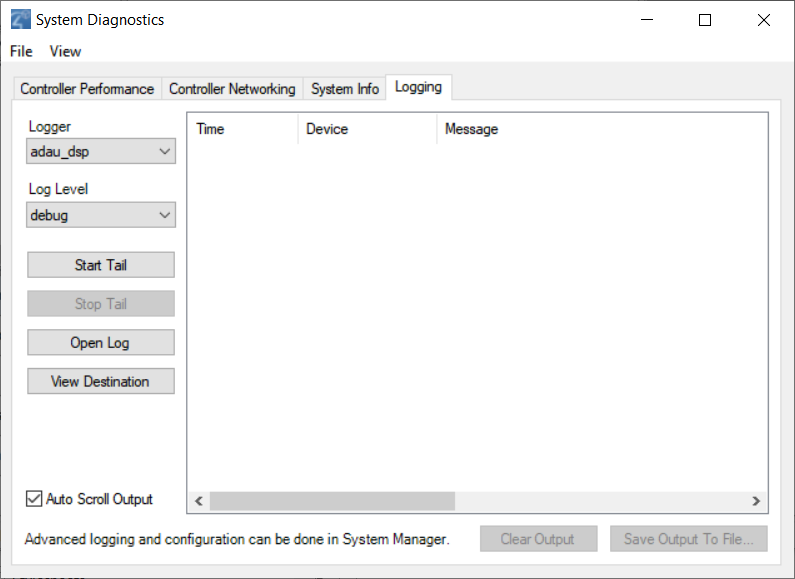
This logging feature lets you:
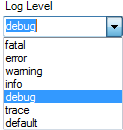
- Change the logging level of any of the program loggers on the operating system. Select from fatal, error, warning, info, debug, trace, and default.
- View the selected log in real time (“Tail”). To start the tail, select the log, then click Start Tail. To stop the tail, click Stop Tail.
- Open the current log file of the selected program logger. To open the log, select the logger, then click Open Log.
- View all the logs available on the device at that location.
- Click Auto Scroll Output to scroll through the log entries, or click Clear Output to clear all entries.
Account Services
From the Tools menu, select Account Services to set up a customer.control4.com account and register a controller, remove a controller from registration, or check in for a service connection. To register the controller, see Registering the Control4 system.
You can also check the current account status and service level. Select the Status tab. You can view:
- Account Status
- Customer Account
- Customer Email
- Service Level
- VPN Status
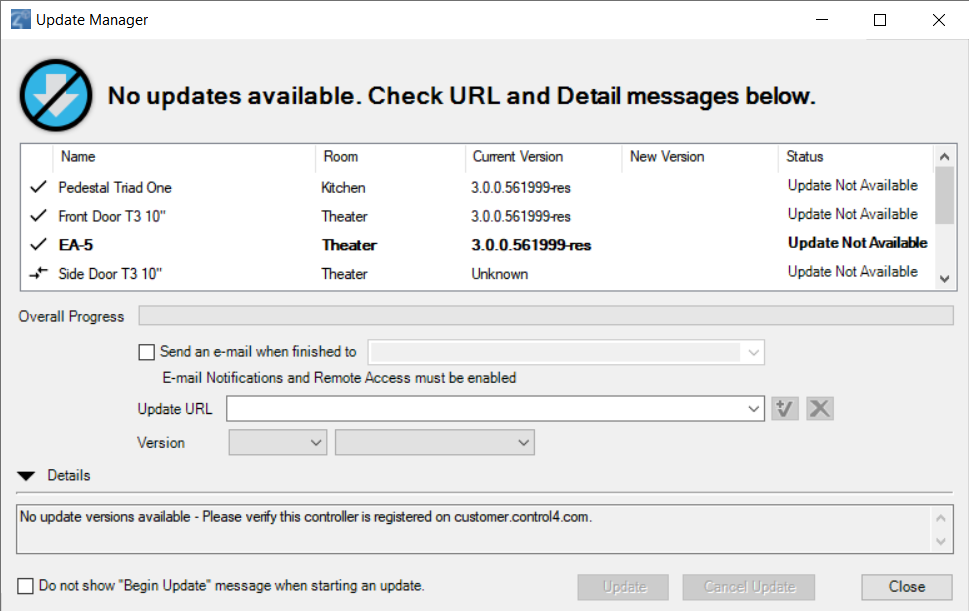
Update Manager
To continue to improve our products, periodically the Control4 team needs to develop updated versions of Composer Pro and Director and provide those updates to you. Use Update Manager to update your Composer software and the system.
To update Director:
- Click Update.

- Click Begin Update.
To update the system software:
- Click Update to update the system. After you begin the updates, you cannot modify your project. Do not remove any power cords or Ethernet cables until the updates are completed. You can have an email message sent to you when the update completes to notify you when you can modify the project again. See “Programming with agents” in the Composer Pro User Guide to set up notifications.
- To view the project, you can close the Update Manager dialog without interrupting the update, but you cannot make any changes.
- Click View Logs in the Update Manager dialog to view the update messages.
- Click Cancel Pending to cancel the device downloads. This action cancels a download from the device.
Note: You cannot cancel an update after the device download has finished and the firmware update on the device has begun.
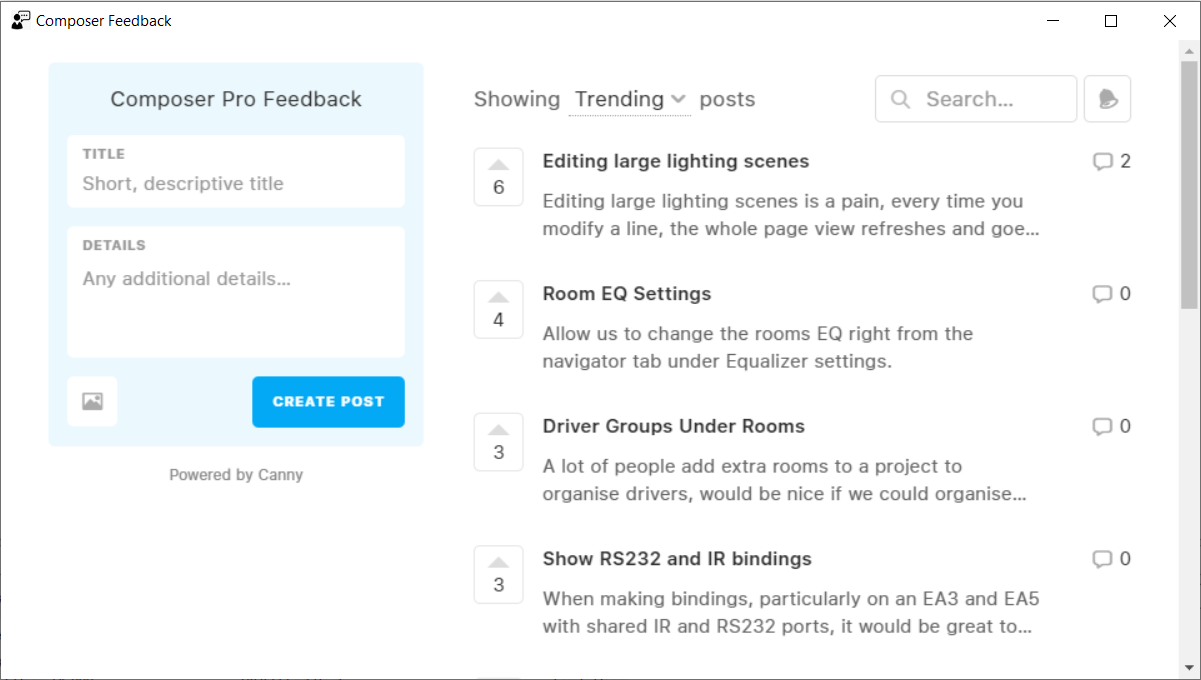
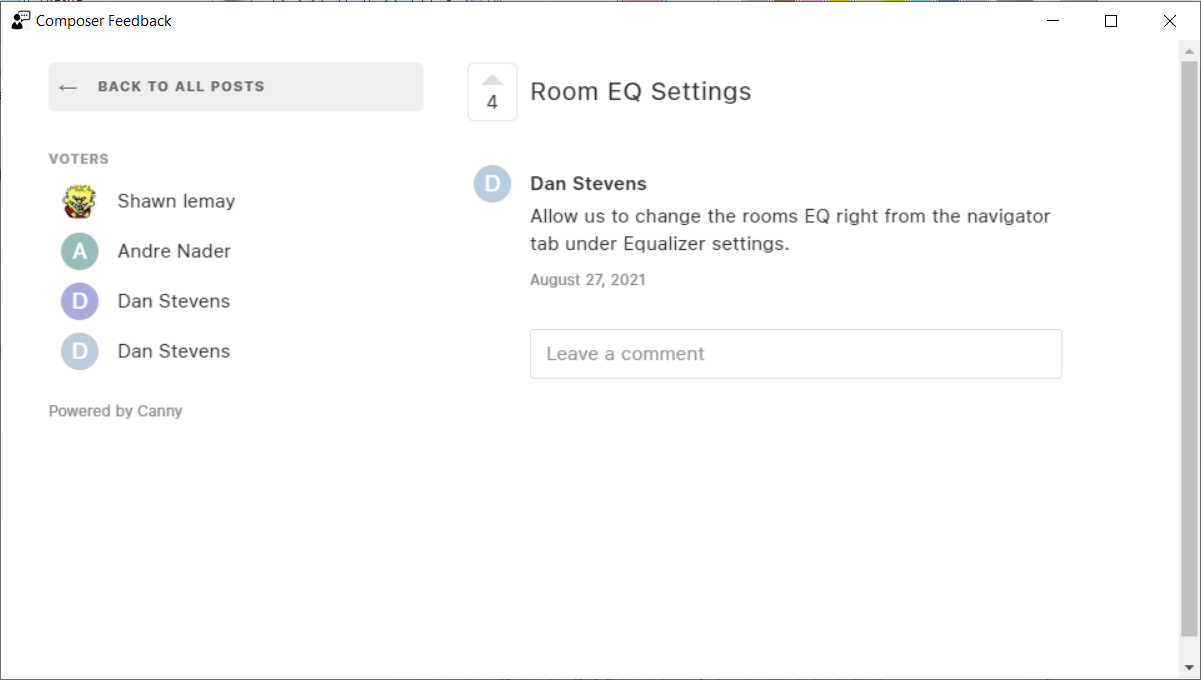
Feedback menu
From the Feedback menu, you can leave feedback, vote on feedback from others, or view Top, Trending, or New feedback. Feedback is organized by Composer (suggestions related to features in Composer) and Drivers (suggestions related to drivers and their documentation).
To use the Feedback menu:
-
Click on the Feedback menu and click on Composer or Driver Suggestions.
-
In the feedback window, you can create a post by adding a TITLE, DETAILS, and clicking on CREATE POST. When a post is created, the feedback menu automatically searches for feedback that is already posted, and rather than create a new post, recommends you add a vote to an existing post and add comments.
-
You can show existing Feedback by Trending posts, posts with the most votes, or newest posts.
-
You can search for feedback by using the search window. Votes can be added to existing feedback by click on the up arrow.

-
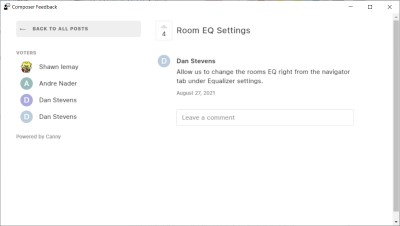
You can view the feedback detail by clicking on the feedback post. You can upvote the feedback on this page and leave a comment..
Help menu
From the Help menu, you can:
- Access the online Help topics, Index, and Search function for this Composer Pro Getting Started.
- Access a PDF of the Composer Pro User Guide. Note: Use the links in the Composer Pro Getting Started help topics to access the PDF for the Composer Pro User Guide.
- Check the Composer Pro and Director versions.
- Contact Control4 Technical Support.
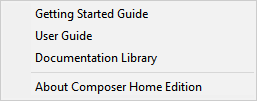
The following options are available:
- Chat with Support—Opens a link to contact Chat Support.
- Getting Started Guide—Displays this Getting Started Guide.
- User Guide—Opens a link to the Composer Pro User Guide.
- Documentation Library—Opens a link to the documentation library on the Dealer Portal.
- Knowledgebase—Displays the Control4 Knowledgebase login. The Knowledgebase contains documents, articles, and other sources for reference.
- Change Logging—Displays the Composer Logging windows to change Composer logging options.
- Reset Composer Layout—Resets saved Composer layout options. This can be useful if a window or section of Composer is not displaying correctly.
- Check for Updates—Checks for available updates to Composer Pro. Select the Check for version of Composer at startup option to have Composer automatically check for updates.
- About Composer—Displays the Composer and Director versions.