Wi-Fi Setup
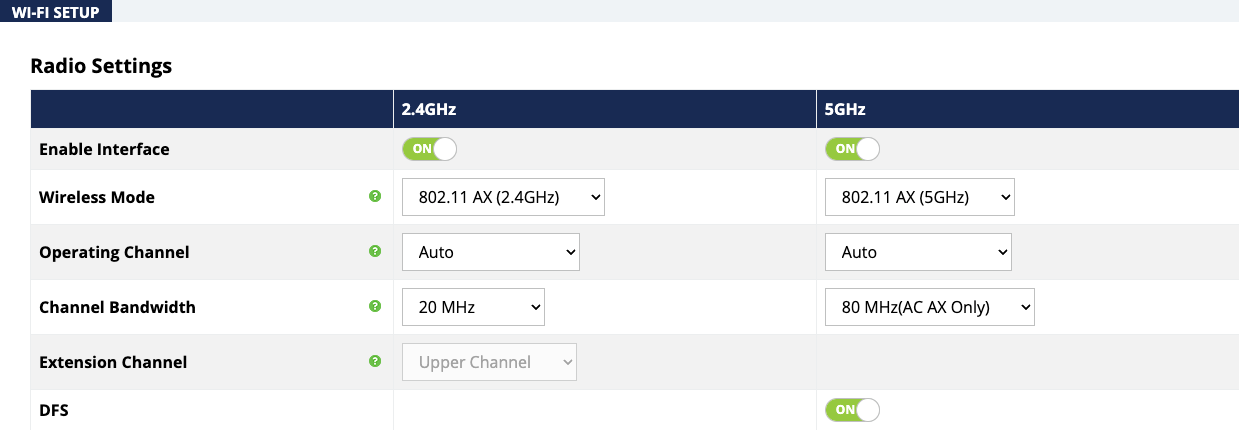
Radio Settings
Configure the access point’s radio settings including wireless modes, operating channels, channel bandwidth, and extension channel.
Path: Settings > Wireless > Radio Settings
Configurable Settings
-
Enable Interface: Toggle to enable or disable the radio interface.
-
Default: Yes.
-
Wireless Mode: Select the wireless mode for the radio.
Default: 2.4GHz - 802.11 B/G/N/AX; 5GHz - 802.11 A/N, 802.11 AC/N, or 802.11 AX. -
Operating Channel: Select the desired Wi-Fi channel. Use a different channel than other APs on the network. On the 2.4GHz radio, there are only three non-overlapping channels: 1, 6 and 11. Select a channel as far away from close-numbered channels as possible.
Default: Auto.
Pro Tip: -_ In a multi-AP environment, put adjacent APs on channels as far apart as possible. A spectrum analyzer tool (such as Metageek’s Chanalyzer Pro) is recommended for providing detailed information about possible channel interference.
-
Channel Bandwidth: Select the desired channel bandwidth. Smaller values allow greater range and larger values provide greater throughput. The combination setting allows the AP to decide.
Default: 2.4GHz - 20MHz; 5GHz - 40MHz, 80Mhz. -
Extension Channel: Specify whether the channel extends above or below the normal 20MHz range. Only applies when the Channel Bandwidth is set higher than 20MHz.
Default: 2.4GHz - Upper Channel; 5GHz - Lower Channel. -
DFS: Toggle to enable the use of DFS channels on the 5GHz radio interface.
Click Save, then Apply Changes when you’re finished with the configuration.
Utilization of SSID
Details the use and availability of SSIDs configured in the AP.
Path: Settings > Wireless > Utilization of SSID

Table Fields
-
SSIDs Used: The number of SSIDs currently in use by devices connected to the AP.
-
SSIDs Available: The total number of SSIDs that can be configured on the AP.
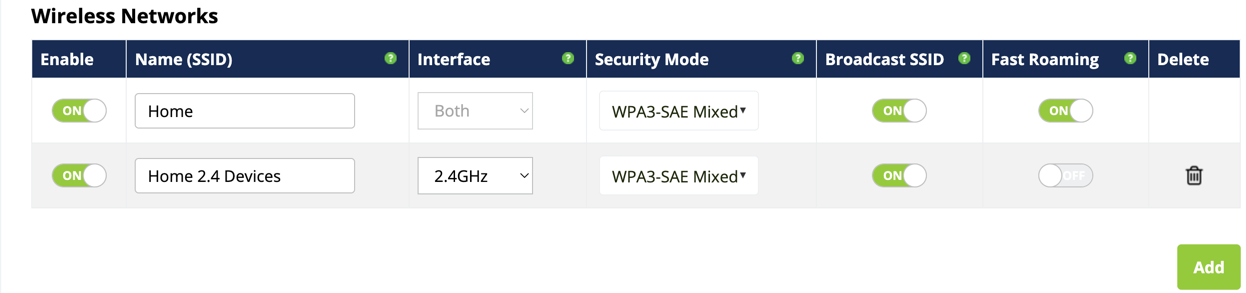
Wireless Networks
Use the Wireless Networks menu to configure wireless networks (SSIDs) and their security settings.
Note: -__.The default araknis_initial SSID settings are not secure and need to be changed.
Path: Settings > Wireless > Wireless Networks
Configurable Settings
-
Enable: Select Yes to make the SSID available.
Default: On. -
Name (SSID): Enter the network name for the network being configured.
Default: araknis_initial (Blank when adding a new network). -
Interface: Select which channel frequencies should be broadcast. 2.4GHz, 5GHz, or Both.
Default: Both, (2.4GHz when adding a network). -
Security Mode: Select a security mode from the drop-down to open the Wireless Security window. See section 10.5 - Wireless Security Options (SSID Encryption) (p.29) for wireless security setup options.
Default: Open -
Broadcast SSID: Toggle whether or not to publicly display the SSID to nearby Wi-Fi devices.
Default: Yes -
Fast Roaming: This feature allows client devices to seamlessly switch between multiple APs broadcasting the same SSID, based on the AP providing the best signal at any time. Read the below Fast Roaming section for more information about this feature.
-
Add: Click to add an SSID.
-
Delete: Click to delete the SSID. The first SSID cannot be deleted.
Click Save, then Apply Changes when you’re finished with the configuration.
Note: -__.Client Isolation and Band Steering can be found at Advanced > Wireless Settings > Wireless Network Settings.
How to Configure a New SSID
Wi-Fi configuration varies depending on the installation site and devices being used on the network. To learn more about general setup, click here for our Wi-Fi Best Practices.
-
From the Wireless Settings page, scroll to the Wireless Networks menu.
-
Click Add if you are creating a new SSID, otherwise modify the settings for the default SSID.

-
Enter a Name for the SSID.
-
Use the Interface drop-down to select 2.4 GHz, 5 GHz, or both frequencies. We recommend using Both unless requirements specify a certain frequency.
-
Select a Security Mode from the drop-down to open the Wireless Security window.
The settings vary depending on the chosen mode. Refer to the proper section and configure the wireless settings as desired, then click Save to return to the main screen.-
Open– Not recommended. Anyone that can find or see the SSID can connect.
-
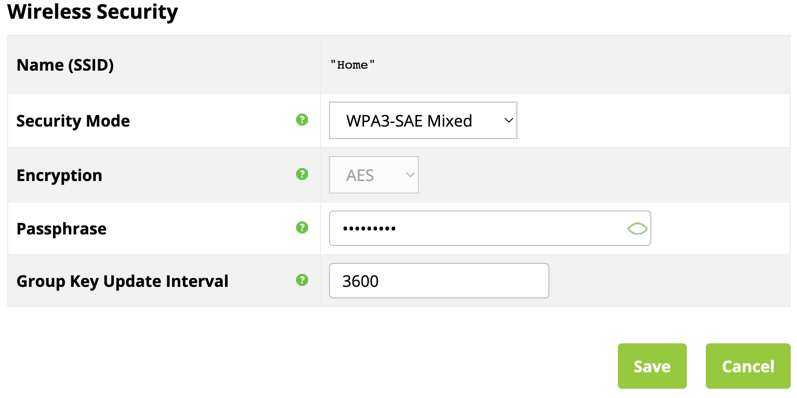
WPA2-PSK, WPA-PSK Mixed, WPA3, and WPA3-SAE Mixed Configuration


-
Name (SSID): The name of the SSID being configured.
-
Security Mode: Displays the current selected mode. You can select a different encryption mode from the drop-down.
-
Encryption: WPA2-PSK. WPA3, and WPA3-SAE use AES. WPA-PSK uses Both (TKIP+AES).
-
Passphrase: Enter a passphrase for the wireless network being configured. If using the ASCII format, the password must be 8-63 characters in length. If using HEX, the password must be 64 HEX characters in length.
Default: Blank
-
Group Key Update Interval: Enter a value to specify how often, in seconds, the Group key changes. This value can be anywhere between 30-3600 seconds.
Default: 3600 (60 minutes)
Click Save or Cancel.
-
-
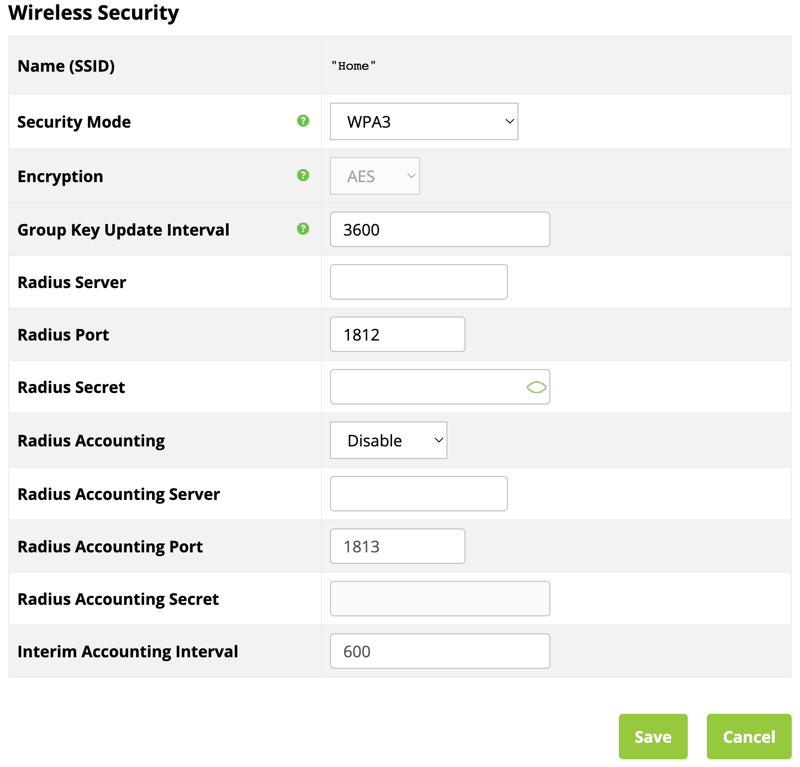
WPA, WPA2, WPA Mixed, and WPA3 Configuration
Note: -__. For RADIUS setup, refer to the server instructions provided by the manufacturer

-
Name (SSID): The name of the SSID being configured.
-
Security Mode: Displays the current selected mode. You can select a different encryption mode from the drop-down.
-
Encryption: WPA. WPA2, and WPA3 use AES. WPA-PSK uses Both (TKIP+AES).
-
Group Key Update Interval: Enter a value to specify how often, in seconds, the Group key changes. This value can be anywhere between 30-3600 seconds.
Default: 3600 (60 minutes)
-
Radius Server: Enter the radius server’s IP address.
-
Radius Port: Enter the radius server’s connection port number.
Default: 1812 (This is a dedicated TCP/UDP port and typically should not be changed.)
-
Radius Secret: Enter the radius server’s connection secret.
Default: Blank
-
Radius Accounting: Use the drop-down to enable or disable radius accounting.
Default: Disable
-
Radius Accounting Server: Enter the radius accounting server’s IP address.
-
Radius Accounting Port: Enter the radius accounting server connection port number.
Default: 1813 (This is a dedicated TCP/UDP port and typically should not be changed.)
-
Radius Accounting Secret: Enter the radius accounting server’s connection secret.
Default: Blank
-
Interim Accounting Interval: Enter a value for how often accounting data will be sent, in seconds. This value can be anywhere between 60-600 seconds.
Default: 600 (10 minutes)
Click Save or Cancel.
-
-

Pro Tip: -_We recommend using WPA3-SAE Mixed. If you have a device that does not support this encryption type, use WPA2-PSK.
-
If you do not want the SSID to be visible in device lists, toggle Broadcast SSID off. This requires users to manually enter the SSID to connect.
-
If there are multiple APs in the project, toggle Fast Roaming on so that client devices can seamlessly switch between APs with the same SSID being broadcast. Read the below Fast Roaming section for more information about this feature.
-
Click Save, a the bottom of the page, then Apply Changes for the new SSID to be written to the AP’s configuration.
Fast Roaming
This powerful feature, known in Araknis products as Fast Roaming, is essential for building reliable Wi-Fi networks with multiple access points. After a client joins a Wi-Fi network, they don’t always stay close to the AP they originally connected to.
Without Fast Roaming, the client remains connected to one AP until signal is lost, then find a new connection. Fast Roaming tells the client when to move the connection, then makes the switch with minimal delay. This keeps clients on the fastest and most reliable AP at all times.
Installation Notes and Frequently Asked Questions
-
Can these new-generation X20 APs be used compatibly with the old gen (x00 and x10) APs?
No.
-
How do I configure the locations of APs for the best performance?
Use a site analyzer tool to determine ideal AP locations. For the best performance, use more APs closer together and reduce the transmit power some to avoid interference (Advanced Wireless Settings).
-
Does it matter what operating channel is used?
If you aren’t using the Auto Operating Channel selection, use a different wireless radio channel in each AP to lower the amount of interference each device encounters.
-
How do I set up Guest Networks with Fast Roaming enabled?
The guest network feature is not ideal for use with Fast Roaming since each AP creates a new DHCP server for clients connected to that SSID. Instead, create a separate VLAN and assign SSIDs for guest use. See the knowledgebase article Araknis Access Point Guest SSID VLAN Setup for instructions.
-
Is this a proprietary technology for Araknis Networks?
No. Fast Roaming utilizes the standard IEEE 802.11r and 802.11k to negotiate hand-off with the client. Only clients that support 802.11r/k are able to perform best in this environment.
-
Do any other AP brands that support Hand-off work with Araknis Fast Roaming?
We don’t guarantee compatibility with any other brands, but will list them if we find any that are.
-
Does any equipment NOT work with Fast Roaming/Hand-off?
Gen 1 Apple iOS products, a number of IoT devices in the market, as well as certain printers - particularly older generation won’t work. Most newer iOS devices work correctly.
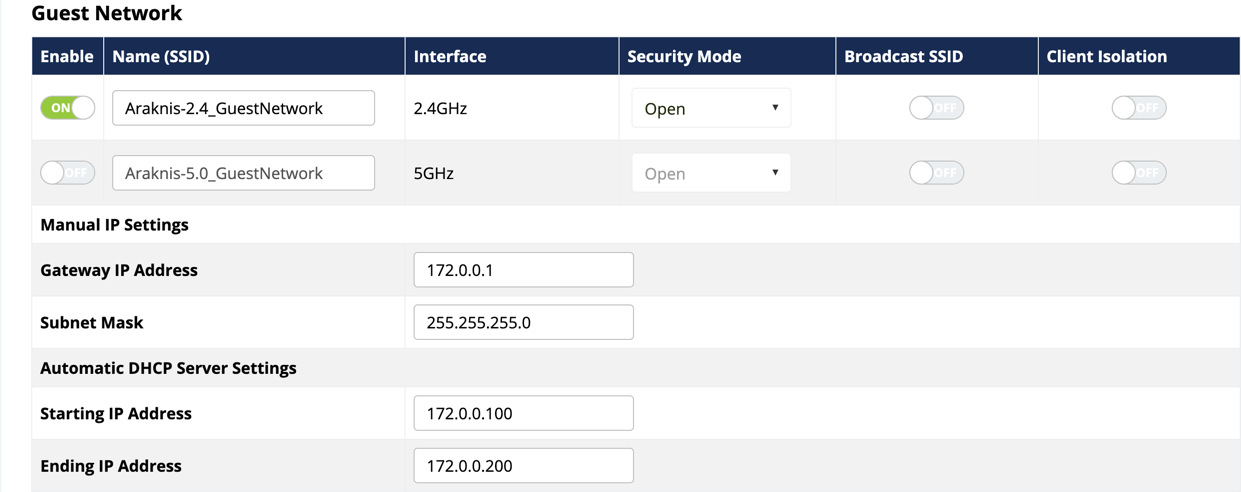
Guest Network Configuration
Used to give guests limited wireless network access by using different security credentials and SSIDs.
Path: Settings > Wireless > Guest Network
Configurable Settings
-
Enable: Check the box to enable a guest network.
Default: Disabled
-
Name (SSID): Enter a name for the guest network.
Default: Araknis-2.4_GuestNetwork
-
Interface: Displays the wireless radio used for the guest network (2.4 or 5.0 GHz).
-
Security Mode: Select a security mode for the SSID. guest networks are limited to Open, WPA2-PSK, WPA2-PSK Mixed, WPA3-SAE, and WPA3-SAE Mixed encryption modes.
Default: Open
-
Broadcast SSID: Select whether or not to publicly display the SSID to nearby Wi-Fi devices Default: Not selected
-
Channel Isolation: Check the box to prevent communication between wireless clients on different SSIDs of the guest network.
Default: Selected
-
Gateway IP Address: Enter the guest network gateway IP address.
Default: 192.168.200.1
-
Subnet Mask: Enter the subnet mask for the guest network gateway.
Default: 255.255.255.0
-
Starting IP Address: Enter the lowest IP address available for the guest network.
Default: 192.168.200.100
-
Ending IP Address: Enter the highest IP address available for the guest network.
Default: 192.168.200.200
-
WINS Server IP: Enter the IP address for the WINS server for the guest network.
Default: 0.0.0.0
Click Save, then Apply Changes when you’re finished with the configuration.
Pro Tip: -_If you’re using guest networks across multiple APs we suggest you use VLANs. Read the knowledgebase article Araknis Access Point Guest SSID VLAN Setup for instructions.