Luma VMS Live View
Here's where you can see all the action.
To add a camera to the live view,
-
drag a camera from the list at left and drop it into a channel window, or
-
click a window to select it and then double-click a camera, or
-
right-click a window and select a video feed.
To remove a camera from a channel window,
-
hover over a channel and select the [close image icon] icon, or
-
right-click on a channel and select Close Channel, or
-
click the [Close all previews icon] on the tool bar at the bottom.
Main screen
The main portion of the screen shows the camera view that you have loaded. Click on any channel window to select it.
The main screen has three control tool: The toolbar at the bottom, the toolbar that appear when you hover over a channel, and the menu that appears when you right-click a channel.
Live View Toolbar
At the bottom of the main window are tools to manage the view.

-
Grid mode. Click the up arrow to view more options.
-
Full-screen mode toggle.
-
OSD toggle.
-
Broadcast toggle.
-
Manual alarm trip.
-
Target tracking box toggle.
-
Close all channel previews.
-
Save the current view mode.
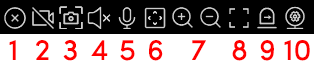
Channel window toolbar (unedited)
When you mouse over a channel, the toolbar below appears at the bottom of the window.
-
Close the channel feed for privacy.
-
Toggle recording the channel.
-
Take a snapshot.
-
Toggle audio for the channel. The platform only can enable audio in one window at a time.
-
Toggle two-way audio between the DVR/NVR and the monitor client or (if the icon has an F in it) between the IPC and the monitor client.
-
Open a PTZ control panel.
-
Zoom in and out (for PTZ cameras, this will be a 3D zoom).
-
Fit the feed to window.
-
Manually activate the channel's alarm.
-
Device settings.
Right-click menu
When you right-click on a channel, the following menu options appear.
Close Channel: Close the video feed for privacy.
Start/Stop Record: Control whether the channel gets recorded.
Instant Playback: Begin playback of the most recent recording.
Audio ON/OFF: Toggle audio for the channel. The platform only can enable audio of one window. If the audio is enabled in one window, the audio in previous window will be disabled.
PTZ Control: Open a PTZ control panel.
Snapshot: Take a snapshot.
Start/Stop Talkback: Toggle two-way audio between the DVR/NVR and the monitor client.
Channel Info.: Display the channel's name, IP address, and the current stream.
Stream: Choose a video stream to display in this window.
Full Screen: Display the channel in full screen.
Image Adjustment: Set the image’s brightness, saturation, contrast, etc.
Manual Alarm Out: Select and trigger an alarm output device.
Aspect dropdown: Force the video to 4:3, 16:9, its original aspect ratio, or full size as needed.
Left Pane
The left side of the live view has three sections.
Devices
This lists the various cameras linked to your account, sorted by area. You can click and drag these into a VMS channel in the main area.
Channel Group (unedited)
This lists the various groups you have set up under the channel grup settings (Home > Resource Management > Channel Group Setting).
You can start the channel group view as follows.
1. Choose the screen display mode according to the channel number of the channel group. Select a window and then double click the channel group name to play all channels in the group.
2. In the current screen display mode, select a window and then click beside the channel group name to play all channels of the channel group in this window in sequence. (Put the cursor on the channel group name to display )
If there is only one sub channel group under the parent group, select a window and then click next to the parent group name to play all channels in the parent group and the sub channel group in the window in sequence.
Select a window and click next to the sub channel group to play all channels of the sub channel group in this window in sequence.
3. If there are several sub channel groups under the parent channel group, click next to the parent group name and then all sub channel groups will play in sequence. The screen display mode will automatically adapt to the channels of the sub group.
Click to play the previous sub channel group; click to play next sub channel group; click to stop auto switch among the sub channel groups.
Stop Channel Group View
Place the cursor on the auto-switch window and then click to stop viewing.
Right click the auto-switch window and then click “Close Channel” to stop viewing.
Click on the toolbar of the live view interface to stop all live view.
View (unedited)
pp. 26–28
Bottom toolbar
Below the video area are a series of control buttons.

-
The numbered set to the left lets you select multicamera views (2×2 through 6×6). Click the up arrow to view additional options.
-
Enable/disable fullscreen mode on the selected camera.
-
Enable/disable OSD on the selected camera on the selected camera.
-
Enable/disable broadcast on the selected camera.
-
Manually activate the alarm on the selected camera.
-
Show/hide the target tracking box on the selected cameras.
-
Close all video feeds for privacy.
-
Save the current view mode
To the right of the buttons are two dropdowns.
-
Stream selection dropdown: This affects all cameras currently on the screen. Select main stream, sub stream, third stream, or self-adaptive stream. If third stream is selected, the system automatically switches to sub stream if the channel or camera doesn’t support third stream.
-
Aspect dropdown: Force the video to 4:3, 16:9, its original aspect ratio, or full size as needed.
Flyout panel (TBD)
Click the arrow at the right margin to explore.