Guidelines
- You can access each screen on the Navigators from the Control4 main menu or for a room from four available tabs. Example: The heated driveway screen is accessed from a custom tab on the main menu. You can configure the tab to be viewed system-wide on all screens, or to view in one room only.
- The Navigators allow up to four tabs per room to access custom screens with custom buttons. Each screen can provide up to six custom buttons for a total of 24 custom buttons. The four tabs in each room can be allocated as either room or as global tabs.
- On the Navigators, you can set up a room or global tabs. The example shows the creation of custom tabs that appear in the Front Room and access a custom screen.
Note: If you want to create a Custom tab to appear globally, check the Global box next to the Screen Name. Because only four screens are available for each room, if a Global button is added and another room already has four screens, the Global button replaces the first screen in that room.
Prerequisites
The following devices are added and identified (with a network address) in the project:
- Controller
- Electronic Gate (In the Control & Audio Video Connections tab, ensure that the Electronic Gate is connected to controller relay Port 4.)
To set up a Custom Buttons agent:
- Start Composer Pro and connect to a Director.
- Click Agents.
- (First time only) Click Add to add the Custom Buttons agent to the project.
- When the dialog appears, from the list, select Custom Buttons.
- Click OK.
- Select the Custom Buttons agent.
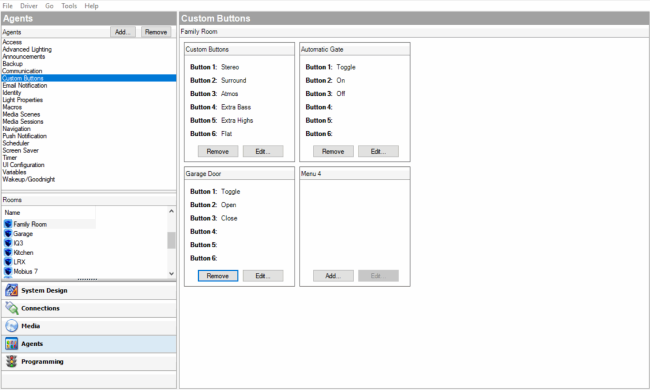
- From the list that appears in the left pane, select the room for the custom button; for example, select Family.

- When the Custom Buttons interface appears, in the Screen 1 area, click Add. Note: In the Navigator, Screen 1 appears in the top left corner; Screen 2 appears in the lower left corner, Screen 3 appears in the top right corner, and Screen 4 appears in the lower right corner.
- Enter the name of the buttons to appear on the Navigator screen.
- Enter the relevant information for the device.
- Screen Name: Garage Door
- Button 1: Toggle
The Screen Name is the name that appears on the access tab to enter the custom screen. The buttons are the names that appear on the custom buttons.
Example: For the Garage Door, enter the following:
- Click the Programming view to program your Custom Buttons.
- In the Device Events pane, scroll down to the agents and select the Custom Buttons agent.
- In the Custom Buttons Events pane, ensure that Family-Garage Door is selected under the Event Screen next to Toggle, and then select the Press radio button. When custom button ‘Toggle’ on screen ‘Garage Door’ in Family is pressed, it appears at the top of the Script pane.

- In the Actions pane, select Garage Door.
- From the Command tab, select the Toggle the Garage Door radio button. The action command appears in the Actions pane.
- Drag the green arrow to the Script pane.
- Select File > Refresh Navigators.
