Example: Use the Access agent
Use the Control4 Access agent view to allow or deny access or hide parts of the user interface on supported touch screens and on-screen TV interfaces. The Access agent is ideal for commercial applications including hotels, bars, or board rooms where settings need to be locked or hidden to restrict their use by unauthorized personnel. By adding this agent to a project, an access code is required to gain access to selected functions of the Status Bar or the More and Settings modules. When enabled, the Access agent settings apply to profiles created in the Identity agent and each profile can be applied to any number of touch screens and on-screen TV interfaces in the system using the UI Configuration agent..

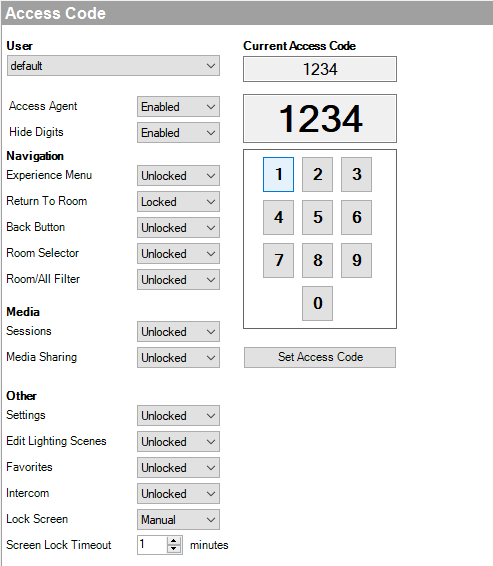
The Access agent provides these key features:
- User—Select a profile and define the Access restrictions for that profile. After you apply the settings to a profile, use the UI Configuration agent to apply the profile to a user interface.
- Current Access Code—The programmer can establish a four-digit access code to restrict access to user interface elements globally.
- Access Agent—Enable or Disable the Access agent for the selected user profile.
- Hide Digits—Hide or show numbers on the user interface when entering the Access Code on a user interface.
Navigation
- Experience Menu—Lock the Experience Menu (C4 icon). If locked, you can only see the favorites in the Room Menu and must enter the Access Code to see the Experience Menu.
- Return To Room—Lock the Return to Room icon (Room icon in the top left that replaces the Experience Menu icon after you select a device). When locked, you must enter the Access Code to return to the Room Menu.
- Back Button—Lock the Back button in the Status bar after you select a menu. For example, with the Back button locked, if you navigate to a camera view, you must enter the Access Code to return to the Cameras Menu.
- Room Selector—Lock or Hide the Room Selector in the Status bar.
- Room/All Filter—Lock or Hide the Filter icon on menus that support filtering like Lighting and Shades. If you lock or hide the filter, you can only see items in the current room unless you change the filter to All.
Media
- Sessions—Lock or Hide the Sessions interface. With the Sessions interface locked or hidden, you must enter the Access Code to control Sessions in other rooms.
- Media Sharing—Lock or Hide the Media Sharing option in the Sessions interface. With Media Sharing locked, you must enter the Access Code to share media with another room.
Other
- Settings—Lock the Settings icon. With Settings locked, to access Settings like Wallpaper or Screensaver options, you must enter the Access Code.
- Edit Lighting Scenes—Lock or Hide the Edit icon on Lighting Scenes.
- Favorites—Lock or Hide the option to add an item as a Favorite.
- Intercom—Lock the Intercom icon.
- Lock Screen—Set to Unlocked, Auto, or Manual to configure a lock screen for the interface. For Auto, configure the Screen Lock Timeout below the Lock Screen option. For Manual, long-press on the C4 icon (or long-press to activate the lock screen.
Prerequisites
- Create a user profile in the Identify agent if you want to apply the Access agent settings to a selected group of interfaces or use the default profile.
- Figure out which Status Bar or other functionality you want to restrict or hide from unauthorized users. For example, do you want to lock the Room Selector? Keep others from getting into Settings? Hide the Favorites button?
- Establish an access code.
To create a profile in the Identity agent:
- Start Composer Pro and connect to a Director.
- Click Agents.
- Select the Identity agent.
- Click Add User.
- In the Create New User window, enter a Username, Password, and Confirm Password. The password must contain 8 digits, 1 capital letter, 1 number, and 1 special character.
To enable the Access agent:
- Click Agents.
- (First time only) Click Add to add the Access agent to the project.
- Double-click on the Access agent to add it into the project.
- Enter a four-digit access code on the numeric keypad.
- Click Set Access Code. The new access code appears in ‘Current Access Code’ window.
- Select Enabled in the Access Agent option.
To apply a user profile in the UI Configuration agent:
- Click Agents.
- Select the UI Configuration agent.
- Select the User tab.

- Select the user profile in Assign user to Touch Screen and click Apply To ....
- Select the user interfaces or rooms to apply the profile to and click OK.

As a reminder, the Access agent enables the programmer to restrict certain features and settings from all users on touch screens and on-screen TV interfaces. Any changes to Access Codes or these settings can only be made using Composer software. If the Access Code is lost or forgotten, it can be recovered only using Composer.