Configure video scanning of network storage
Use the System Design and Media views to set up scanning of video devices, such as disc changers or media players, to play video files from network-attached storage. Scanning can occur for devices or extensions.
Prerequisites
- Ensure that the video device is installed as directed in the Control4 Installation and Setup Guide for the device.
- Ensure that the Network File Storage driver is added to the room in the Composer Pro project.
To configure video scanning:
- Start Composer Pro and connect to a Director.
- Click System Design.
- In the project tree, select Network File Storage.
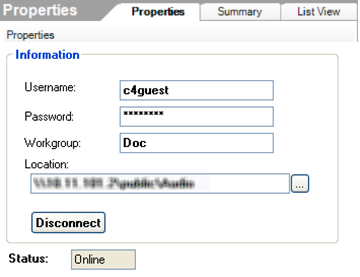
- (Optional) To access the files in the storage, if you have password protection enter your user name, password, and workgroup in the Properties pane. If you do not have password protection, go to Step 6. Click the browse button to locate the path if you don't know it.
- Click the Search button to locate the storage.
- Click Connect.
- Click the Media view.
- In the tree, select Media Scanning Options to set up a schedule for scanning. To set up to scan the media now, click Scan Now, skip Step 9, and then read the Scanning Schedule in Step 10.
- Set up the scanning schedule and the files to scan.
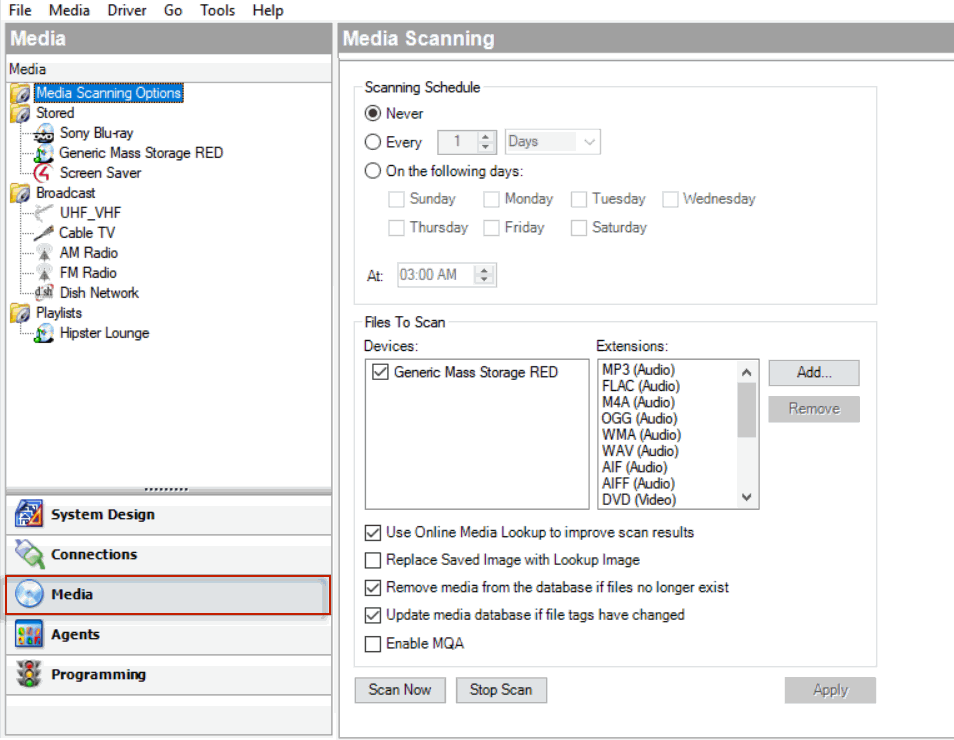
- Scanning Schedule—Select one.
- Never—Select if you never want to schedule an automatic scan.
- Every x Days or Weeks (up to 10) —Select the frequency to scan.
- On the following days—Select Sunday through Saturday.
- At <time>—Use the up and down arrows to select the time. Highlight AM or PM and type the value: AM or PM.
- Files To Scan—Select a device and extension.
- Network File Storage—Select if you have a NAS you want to scan.
- USB Drive—The manufacturer's USB drive appears here. Select if you have a USB drive you want to scan.
- Extensions—Use the up and down arrows to select the format to add or remove from the list. To add a format if it doesn't appear in the list, use the down arrow to select the extension, select Video, and then click Add. Click Remove to remove that format from the list. Note: The list only allows format types that are supported in the Control4 system.
- Use Online Media Lookup to improve scan results—Check if you don't want the search to access the Internet for every format lookup, for example, a specific title or cover art. Tip: Properly tagged files will result in must faster access.
- Remove media from the database if the files no longer exist—Check to remove database information when a media file has been deleted. Be careful, however, because if, for example, you disconnect a USB drive with media on it, the database files will delete them if checked, and you may not want to delete them if you use the drive again.
- Update media database if file tags have changed—Check to have the database updated if the metadata changes.
- Click Apply.
- Click Scan Now to start the scan immediately or Stop Scan if you've started the scan and want to stop it.