Configure Triad One for Wi-Fi
To configure a Triad One for Wi-Fi use:
- Start Composer Pro and connect to Director on Local Network.
- In the Tools menu, select System Manager.
- In the Devices pane, select the network address of the device you want to configure, and click Connect.

Tip: If the device’s network address is not on this list, click Refresh. If it still does not appear, click Add to enter it manually. If you don’t know the network address, look in the Tools menu > Network Tools.
- Click the Network tab, and click Configure.

- Click Next when a Network Configuration wizard dialog appears.
- If desired, enter a new name for the device, and click Next.
IMPORTANT TIP! If the device has already been identified on the Control4 system, and you change the name (on this wizard screen), identify the device again. Until it is identified again, the controller cannot recognize the name and will not be able to communicate with the device.

- Select the type of network you want the device to be a part of, and click Next.
Example: Wireless network.
- Select the method to obtain an IP address, such as DHCP (first option) or Static IP (second option) , and click Next.
Example: Obtain an IP address automatically using DHCP.
- Select the method to obtain the DNS server address automatically, and click Next.
Example: Obtain the DNS server address automatically.
- Enter the Network Name (SSID) of your wireless access point.
- Use the pull-down menu to indicate your Data encryption preference (64 or 128 bit).
- Select the Key type (hex or ASCII).
- Enter your Network Key (WEP Key), and click Test.
- Hex—64 bit (10 digits) or 128 bit (26 digits)—acceptable values 0 - 9, A- F
- ASCII—64 bit (5 digits) or 128 bit (13 digits)—acceptable values ASCII characters
Example:
- Network Name (SSID)—<name of wireless access point>
- Data encryption—wep64
- Key Type—hex
- Network Key (in hex)—ABCDE12345.
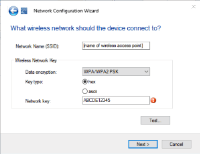
Note: If the hex Network Key you insert is not valid, a screen with a red exclamation point comes up. In this case, enter your key again.

- Click Test to test your network connection. If it fails, follow the on-screen instructions.
- Click Finish when you come to the “Congratulations! You have successfully changed your network configuration” screen.
- At this time, the system reboots. Do not disconnect any temporary Ethernet cables until the device has successfully rebooted and is powered on.
- If you are using the Wi-Fi to communicate to your controller, disconnect the Ethernet cable.