Configure a Wireless Outlet Dimmer V2
Use the System Design and Connections views to configure a Wireless Outlet Dimmer V2. Configure the Wireless Outlet Dimmer to control and dim lamps.
Prerequisites
- Ensure that the Wireless Outlet Dimmer is installed and set up as directed in the Control4 Wireless Outlet Dimmer Installation Guide available on the Dealer Portal.
- Ensure that your project has a Control4 controller added and identified on the Control4 system.
To add and configure a Wireless Outlet Dimmer:
Note: Each Wireless Outlet Dimmer has two outlets: Outlet 1 and Outlet 2. When the Wireless Outlet Dimmer is plugged into an outlet and oriented as shown below, Outlet 1 is on the left and Outlet 2 is on the right.
- In the Items pane > My Drivers tab > Lighting > Outlet Lighting double-click the Wireless Outlet Dimmer V2 object driver to add it to the project.
- Double-click the Dimmable Light (Outlet) object to add a light to the outlet. Repeat if you want to add another.
- Ensure that at least two objects are added to the project tree:
- One for the Wireless Outlet Dimmer
- One other object representing Outlet 1 (plus another, if you want to use Outlet 2).
- To configure the properties, click System Design. In the project tree, select the Wireless Outlet Dimmer V2 object to view the device properties.
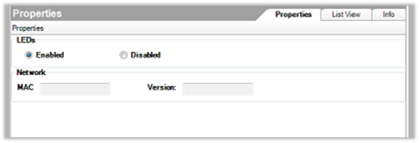
- LEDs—Allows you to enable/disable the outlet indicators on top of the Wireless Outlet Dimmer.
- Network—These are read-only fields for the switch’s network settings.
- Add a driver for the device you want to plug into the Wireless Outlet Dimmer as appropriate for your use.
- Click Rates
- Preset Level—The percentage of the load to which the dimmer ramps when turned on.
- Ramp Up—The rate the light ramps from off to on when the button is clicked.
- Ramp Down—The rate the light ramps from on to off when the button is clicked.
- Hold Ramp Rates
- Up—The time, in seconds, it takes the light to ramp to 100% when a button controlling the light is pressed and held.
- Down—The time, in seconds, it takes the light to fade to 0% when a button controlling the light is pressed and held.
- Minutes Off—Minutes light has been off since going online.
- Minutes On—Minutes light has been on since going online.
- Minutes On Today—Minutes light has been on since midnight.
- Current Power—N/A.
- Energy Used—N/A.
- Energy Used Today—N/A.
To add a lamp, add a Dimmable Light (Outlet) to the project. Go to the System Design view in the Items pane. Select the My Drivers tab > Lighting > Outlet Lighting, and double-click the Dimmable Light (Outlet) object.

Note: This is the Dimmable Light (Outlet) object, and not the regular Wireless Outlet Dimmer V2 object.
Configure the following fields:

Dimmer Information
LED Information—Sets the colors of the keypad buttons that are bound to the light. Select Top, Bottom, or Toggle LED colors, based on the type of keypad button binding used.
Energy Information
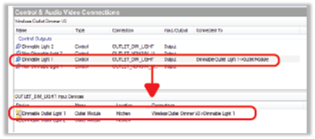
- Make a connection between the Wireless Outlet Dimmer V2 and the device that is plugged into the Wireless Outlet Dimmer.
- In the Connections view, select the device that is plugged into the Wireless Outlet Dimmer.
- From the top screen, drag the appropriate connection to the Wireless Outlet Dimmer connection on the bottom screen.
Example: Connection between the Wireless Outlet Dimmer and the light outlet.