Configure a Bus Ethernet Gateway
Use the System Design and Connections views to configure a Bus Ethernet Gateway.
To add and configure a Bus Ethernet Gateway:
- To add the driver and identify the device see “How to add devices to a project.” Ensure that the Bus Ethernet Gateway driver is added to the project tree (see the next step).
- In the Items pane > My Drivers tab > Lighting select the Bus Ethernet Gateway to add the driver to the project tree.
- Click each button to define its name and behavior.
Bus Ethernet Gateway Properties:
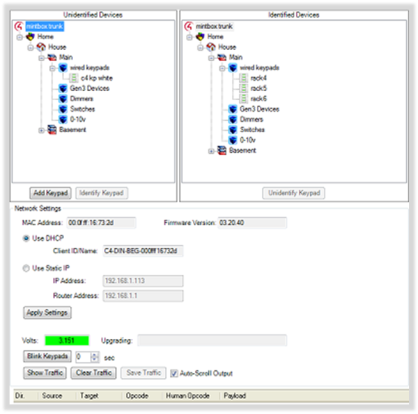
Unidentified Devices
- Add Keypad—Allows you to indicate which keypads are to be bound to this keypad. This is a convent way of doing mass bindings, instead of having to use the Connection page. Only keypads bound to the gateway will appear in the two project trees.
- Identify Keypad—Identifies the currently selected keypad. A window will appear with further instructions.
Identified Devices
- Unidentify Keypad—Un-identifies the currently selected keypad. Un-identifying resets it to its default state.
Network Settings
- MAC Address—Read-only field displaying the network’s MAC address of the device.
- Firmware Version—Indicates the firmware version for the device.
- Use DHCP—Select this option to use DHCP, then click Apply Settings. The Client ID appears in the read-only field.
- Use Static IP—Select this and enter values for the IP Address and the Router Address to use Static IP, then click Apply Settings.
- Volts—(read-only) Displays the voltage rating coming from the device. Green background=ok, yellow=caution, red=warning.
- Upgrading—(read-only, normally blank) If updating, displays a progress bar and ID of the upgrading device.
- Blink Keypads—For debugging. Set the number of seconds you want the keypads to blink, then click Blink Keypads.
- Show Traffic—Displays network traffic crossing the gateway. Clear Traffic clears the log, and Save Traffic allows you to save the log.