0-10V properties
Properties
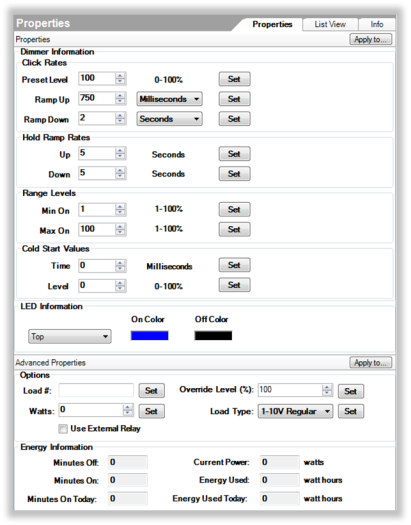
- Dimmer Information
- Click Rates
- Preset Level—The percentage of the load to which the dimmer module ramps when turned on.
- Ramp Up—The rate the light ramps from off to on when the button is clicked.
- Ramp Down—The rate the light ramps from on to off when the button is clicked.
- Hold Ramp Rates
- Up —The time, in seconds, it takes the load to ramp to 100% when a button controlling the load is pressed and held.
- Down—The time, in seconds, it takes the load to fade to 0% when a button controlling the load is pressed and held.
- Range Levels
- Min On—The minimum dimmed level, for example, 10%.
- Max On—The maximum dimmed level where the light will not get any brighter, for example, at 80%, the light will never get brighter than that.
- Cold Start Values
- Time—Use the arrows selection box to select the time in milliseconds. The default is 0. This is the length of time a light takes to warm up before it dims down to the Cold Start Level setting.
- Level—Use the arrows selection box to select the minimum cold start % light level in 1% increments.
- LED Information—The virtual LED colors used when a keypad button is bound to the load. Select Top, Bottom, or Toggle LED Colors.
Advanced Properties
- Options
- Load #—The load number and circuit number may be specified in the lighting plan. Adding that information here will provide the link from the lighting plan to the project and then to the reports that must be generated later (see "Reports " in this document for details). If the lighting plan doesn't include load numbers, it's a good idea to create a unique load number for each load leg. To do this, assign a number for each floor (e.g., Basement = 1, Main = 2). Assign a number for each room on the floor (e.g., Kitchen=01, Master Bedroom = 02), and add a number for each light in the room (e.g., 01, 02, 03, etc.). So the load number would look something like this: '02-01-03.’ The load number must be unique for each Panelized Lighting device.
- Watts—The wattage value of the light (or collection of lights in the load leg). You must enter this value prior to connecting the light to a module to ensure that the wattage calculations are correct and that the module does not overload. Example: The light leg controls six can lights in the Kitchen; each can is 100 watts. In this case, enter 600 watts (6 x 100).
- Override Level(%)—Defines the level or on/off state that the dimmer load will be set to when the module override button is pressed or when the auxiliary override is engaged.
- Load Type—Select an option based on the specific type of 0-10V light being used:
- 0-10V Regular—Used when 0V = minimum dimmed level and 10V = maximum level. Note that most “0-10V” lights do not actually use 0-10V, they use 1-10V. Only select this option if you know that the light actually requires true 0-10V control.
- 1-10V Regular—Used when 1V = minimum dimmed level and 10V = maximum level. This is the default selection as it is the actual standard for 0-10V lights.
- 0-10V Inverted—Used when 10V = minimum dimmed level and 0V = maximum level. (Rarely used.)
- 1-10V Inverted—Used when 10V = minimum dimmed level and 1V = maximumlevel. (Rarely used.)
- Use External Relay—Check the box if an external relay such as a Leviton Power Pack Relay will be used for on/off control of the 0-10V light. Uncheck if on/off control will be provided by a Control4 Relay Module or if the 0-10V light does not require separate on/off control. If the Use External Relay box is checked, the 0-10V light will not be able to be connected to a Control4 Relay Module and the reports will indicate that an external relay should be used.
Energy Information
- Note—Energy information is only provided when the 0-10V light is connected to a Control4 Relay Module.
- Minutes Off—The number of minutes that the load has been off since the relay module was last reset.
- Minutes On—The number of minutes that the load has been on since the relay module was last reset.
- Minutes On Today—The number of minutes that the load has been on today.
- Current Power—The current power being used by the load (in watts).
- Energy Used—The total number of watt hours used by the load since the device was last reset.
- Energy Used Today—The total number of watt hours used by the load from 12:00 AM until 11:59 PM today.