Installing and connecting the hardware
Before you can set up a Control4 home automation system in Composer Pro, all of the devices to be used in the system need to be installed and connected to the home network. Additional devices can be added and identified to the Composer Pro project if you install or replace devices in the future.
Follow these guidelines to get started:
- Create a system specification, and refer to it so you can answer these questions.
- What does the home have?
- Any there any outer buildings, for example a detached garage, that will be automated? All buildings to be automated must be included in the project.
- How many floors are there in each building? For example, the house has three floors and a basement; the garage has one floor.
- What rooms are on each floor? For example, the third floor of the house has one Master Bedroom and two other bedrooms. The third floor also has one Master Bath and one Main Bath.
- Which Control4 devices are or will be installed in each room (include manufacturers and model numbers)?
- Which third-party devices are or will be installed in each room (include manufacturers and model numbers)?
- If any of these devices has a choice of power sources, indicate how the device will be powered: AC, DC, or batteries.
- If any of these devices has communication options, indicate how each device will communicate with the controller (how the device will be controlled): Ethernet, Power Over Ethernet (POE), Wi-Fi, Zigbee® Pro, IR, serial, contact, or relay.
- Install and connect the Control4 devices as described in the installation or setup guide that ships with each device.
Tip: See also “Related documents and resources” in this guide for document locations.
- Install and connect all third-party devices, for example, audio-video devices, door contacts, and security panels, as described in the installation guide that ships with each device.
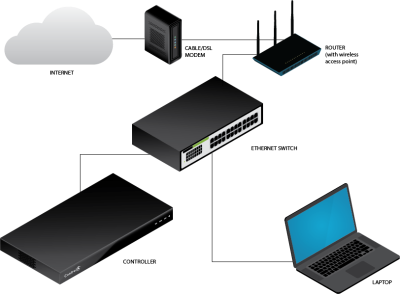
- Connect the Control4 controller and your PC to the home network. Initial setup of the controller requires a hard-wired (Ethernet) connection to the network, and an Ethernet connection is always recommended. A simple Control4 system and home network are shown below.
- Use the RJ-45 jack labeled ‘Ethernet’ on the back of the controller to connect it to the home network. If successful, the amber LED turns on and the green LED blinks. Read the controller’s installation guide to learn how the LEDs work.
- Use either a wireless access point (WAP) or Ethernet cable to connect the PC to the home network.
- Confirm that the Control4 devices are getting network addresses from the gateway, router, or switch. See the Composer Pro User Guide for details.