Device settings for dimmers
Properties (applies to: Keypad Dimmer, Forward Phase Dimmer, Adaptive Phase Dimmer, 0‑10V Dimmer)
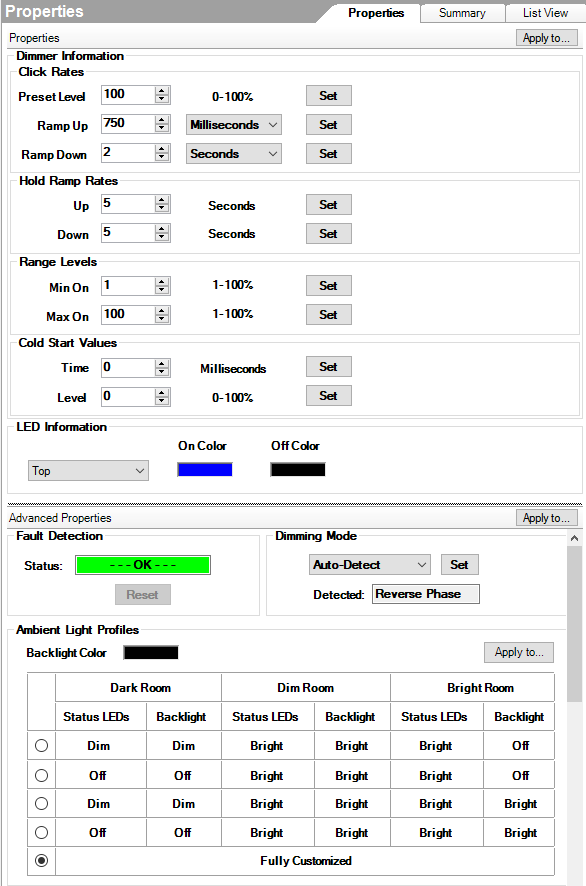
- Click rates
- Preset Level—The percentage of light output is used for On.
- Ramp Up—The time it takes to reach the preset On level.
- Ramp Down—The time it takes to reach 0% (Off).
- Hold Ramp Rates
- Up—The rate in seconds for reaching the Max On level from an Off state when the top button is held down.
- Down—The rate in seconds for reaching the Off state from an On state when the bottom button is held down.
- Range Levels
- Min On—The percentage of light for the minimum “On” power level. The default is 0. The functional minimum level can vary, depending on the light type (such as incandescent, fluorescent, compact fluorescent, and LED).
This is especially important in compact fluorescent (CLF) and LED lighting that sometimes have a minimum threshold for producing visible light that could be anywhere from the 10-40% range. Some loads will flicker or pulse right at their minimum threshold.
Example: A bulb doesn’t produce visible light until it reaches 20%. The minimum On to 25% will ensure a clean On transition.
- Max On—This setting enables capping the light level for a given load below 100%, either to enhance bulb life or match the light level in a given living space better. This is an absolute maximum level rather than the Preset On level, which can be bypassed.
- Cold Start Values—These settings are mainly applicable to compact fluorescent (CFL) loads. Switching from an Off state to On sometimes exhibits a higher visible light threshold than after the CFLs have been on and have warmed up. If a Cold Start % is set (above the Minimum On %), the dimmer cleanly jumps to that level from Off to On. However, when the dimmer has been on for the time period designated by the Cold Start timer, the dimmer can ramp below the Cold Start On % to the minimum On%.
Example: Fluorescent lights go on, warm up, and then will dim down to the Minimum On Level % setting. Tapping the keypad on a 2-button dimmer sets the light to its preset level. If you press and hold the button, the light checks the Minimum On Level % setting.
- Time— The time a light takes to warm up before it dims (ramps) down to the Cold Start Level setting.
- Level— The light level that the bulb returns to after bulb warmup. This value must be higher than the Min On level defined under Range Levels.
- LED Information
- Top—The On and Off LED colors for the top LED.
- Bottom—The On and Off LED colors for the bottom LED.
- Toggle—The LED colors of the LEDs while being held down(?).
Advanced Properties
- Fault Detection
- Status—Displays the device’s current fault status. Green is normal, but red indicates a fault.
- Reset—Resets the fault status indicator. If the fault repeats, make sure that the load type is compatible, that the device is wired correctly, and that the device is not damaged.
- Dimming Mode (Adaptive Phase Dimmer only)
- Ambient Light Profiles
- Select a preset brightness profile for the keypad backlight and LEDs that changes their brightness according to the room’s ambient light. You can also select Fully Customized and manually set each brightness level according to ambient lighting.
- Backlight Color—Sets the keypad’s backlight color. If you don’t want a keypad backlight, keep the default setting (black).
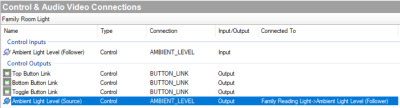
- Sensing—The ambient sensing mode and follow source are displayed in the Sensing window.
- Mode—The ambient light sensing modes are: Independent (using the light's own sensor), Source (another light is using this light's sensor) or Follower (using the sensor from another light). If Mode is Follower, the source device is listed.

- In Connections, select the lighting devices to be the Source device. Connect the Ambient Light Level (Source) connection in Control Outputs to each Follower light or keypad.


Button Settings
- Engraving—Text that you want printed onto the buttons. See “” in this document. Note: When the custom engraved keycaps are installed, make sure that the device properties in Composer HE match the device’s actual configuration..
- Finish—Color of the buttons.
- Icons—Icons that you want printed onto the buttons. To add an icon to the Engraving text box, click Icons, then double-click the icon to add.
- Buttons Control Load—When selected, this checkbox tells the system that the device directly controls an electrical load, such as a light fixture.
- LEDs Follow Load—When selected, this checkbox tells the dimmer’s LEDs to indicate the electrical load status.
- Use as 2 Button Keypad—When selected, this checkbox allows you to configure and program the device as a 2-button keypad, and a new section “2 Button Keypad Settings” appears.
- Hide From Nav—When selected, this hides the keypad from any Navigator. Navigators must be refreshed for this setting to take effect.
2 Button Keypad Settings (visible only when “Use as 2 Button Keypad” option is selected)
- Button—Select the button to configure.
- LED Behavior
- Follow Bound Device—LED behavior reflects the state of the device the button is bound to.
- Follow Load—LED behavior reflects the state of the lighting load (on or off).
- On Color—Sets the LED color when the controlled load is on.
- Off Color— Sets the LED color when the controlled load is off.
- Push/Release—LED behavior reflects the button state (pressed or released).
- Push Color—Sets the LED color while the button is pressed.
- Release Color— Sets the LED color while the button is released.
Energy Information (view only)
- Minutes Off—Elapsed minutes since device was turned off.
- Minutes On—Elapsed minutes since device was turned on.
- Minutes On Today—Total minutes device has been on for the current day.
- Current Power—Power being consumed by the device at the present time.
- Energy Used—Total watt hours consumed by the device over its lifetime.
- Energy Used Today—Watt hours consumed by the device for the current day.
Network—The current MAC address and firmware version of the selected device. These fields are not editable.
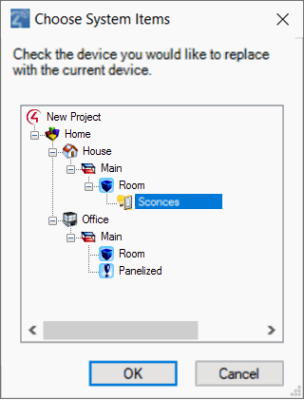
Replace Legacy Control4 Device
- Replace Light—Replaces a legacy device in your project with this new device. After you configure this new device, click this button, select the older device in the mini project tree that opens, then click OK.

- Ignore device when it comes online—When selected, this checkbox tells the system to ignore the older device when it comes back online.