Device settings for Configurable Keypads
Properties
- Button Settings
- Name—The name of the button (used for defining its connections to other devices or events within Composer HE).
- Engraving—Text that you want printed onto the buttons. For more information, see “Ignore device when it comes online—When selected, this checkbox tells the system to ignore the older device when it comes back online.
- ” below.
- Icons—Icons that you want printed onto the buttons. To add an icon to the Engraving text box, click Icons, then double-click the icon to add.
- LED Behavior
- Follow Bound Device—LED behavior reflects the state of the device the button is bound to.
- Push/Release—LED behavior reflects the button state (pressed or released).
- Push Color—Sets the LED color while the button is pressed.
- Release Color— Sets the LED color while the button is released.
- Finish—Color of the buttons.
Advanced Properties
- Ambient Light Profiles
- Select a preset brightness profile for the keypad backlight and LEDs that changes their brightness according to the room’s ambient light. You can also select Fully Customized and manually set each brightness level according to ambient lighting.
- Backlight Color—Sets the keypad’s backlight color. If you don’t want a keypad backlight, keep the default setting (black).
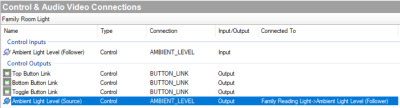
- Sensing—The ambient sensing mode and follow source are displayed in the Sensing window.
- Mode—The ambient light sensing modes are: Independent (using the light's own sensor), Source (another light is using this light's sensor) or Follower (using the sensor from another light). If Mode is Follower, the source device is listed.

- In Connections, select the lighting devices to be the Source device. Connect the Ambient Light Level (Source) connection in Control Outputs to each Follower light or keypad.


- Network—(wireless keypads only) Displays the MAC address and firmware version of the selected device. These fields are not editable.
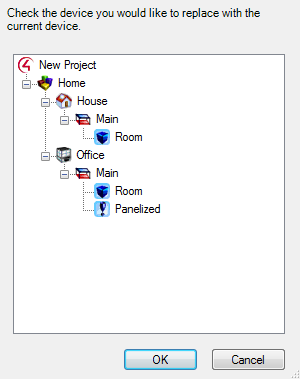
- Replace Legacy Control4 Device
- Replace Keypad—Replaces a legacy device in your project with this new device. After you configure this new device, click this button, select the older device in the mini project tree that opens, then click OK.