System Settings
System Information
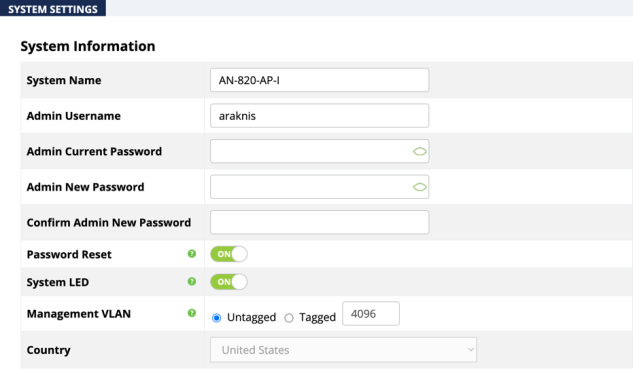
Use the System Information page to configure administration and access settings.
Path: Settings > System > System Information
Configurable Settings
-
System Name: Enter a meaningful name such as SmithHome or SmithBasement. Limited to 32 characters, including spaces.
-
Admin Username: Enter a username for logging into the access point. Use letters, numbers, or punctuation. Limited to 32 characters, including spaces.
Default: araknis -
Admin Current Password: Enter the current login password when changing the password.
Default: araknis -
Admin New Password: Enter a new login password. Use letters, numbers, or punctuation. Limited to 32 characters, including spaces.
-
Confirm Admin New Password: Enter the same password as above, to confirm.
-
Password Reset: This toggle disables/enables the physical password reset button on the AP. Disabling this feature requires a full factory reset of the AP to reset the username/password.
-
System LED: Turn the Status LED ON or OFF.
Default: ON -
Management VLAN: The VLAN ID you must be connected to for access to the AP web interface.
-
Default: Untagged
Caution: -.Changing the management VLAN could cause loss of to access to the web interface. Connect your computer to the new management VLAN or reset the AP to regain connectivity.
-
Country: Select the country of the install location to comply with local standards.
-
Default: United States
Note: -__.This setting is only configurable on international models.
Click Save, then Apply Changes when you’re finished with the configuration.
Date and Time Settings
Configure the system date and time settings that are displayed in the AP menus and logs.
Path: Settings > System > Date and Time Settings
Pro Tip: -_Use the default Automatically Get Date and Time setting. Manual configuration may not remain accurate after power outages or resets.

Configurable Settings
-
Manually Set Date and Time: Select to manually set the date and time.
-
Date: Enter the year, month and date (four digits for year; two digits for month, and two digits for date).
-
Time: Enter the hour and minutes for the current time. Use a mobile device or satellite clock for accuracy.
-
Synchronize with PC: Click this button to automatically sync the access point to the connected computer’s clock.
-
Automatically Get Date and Time: Automatically get the date and time from a 3rd-party NTP server.
-
NTP Server: Select an NTP (Network Time Protocol) Server to reference for the standard date and time.
Default: time.nist.gov (recommended)
Click Save, then Apply Changes when you’re finished with the configuration.
Time Zone Settings
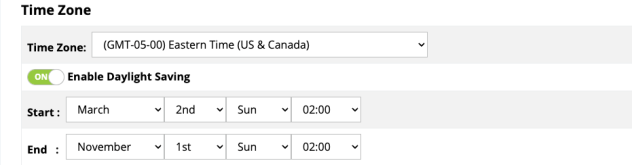
Configure the time zone and Daylight Saving settings for the install location.
Path: Settings > System > Date and Time Settings
Configurable Settings
-
Time Zone: Select the appropriate time zone from the drop-down.
-
Enable Daylight Saving: Select to enable.
-
Start: Select the month, date, day and time Daylight Saving Time starts from the drop-downs.
-
End: Select the month, date, day and time Daylight Saving Time ends from the drop-downs.
Note: -__.Daylight Saving start and end can change from year to year. Be sure to update this information to avoid potential network errors.
Click Save, then Apply Changes when you’re finished with the configuration.